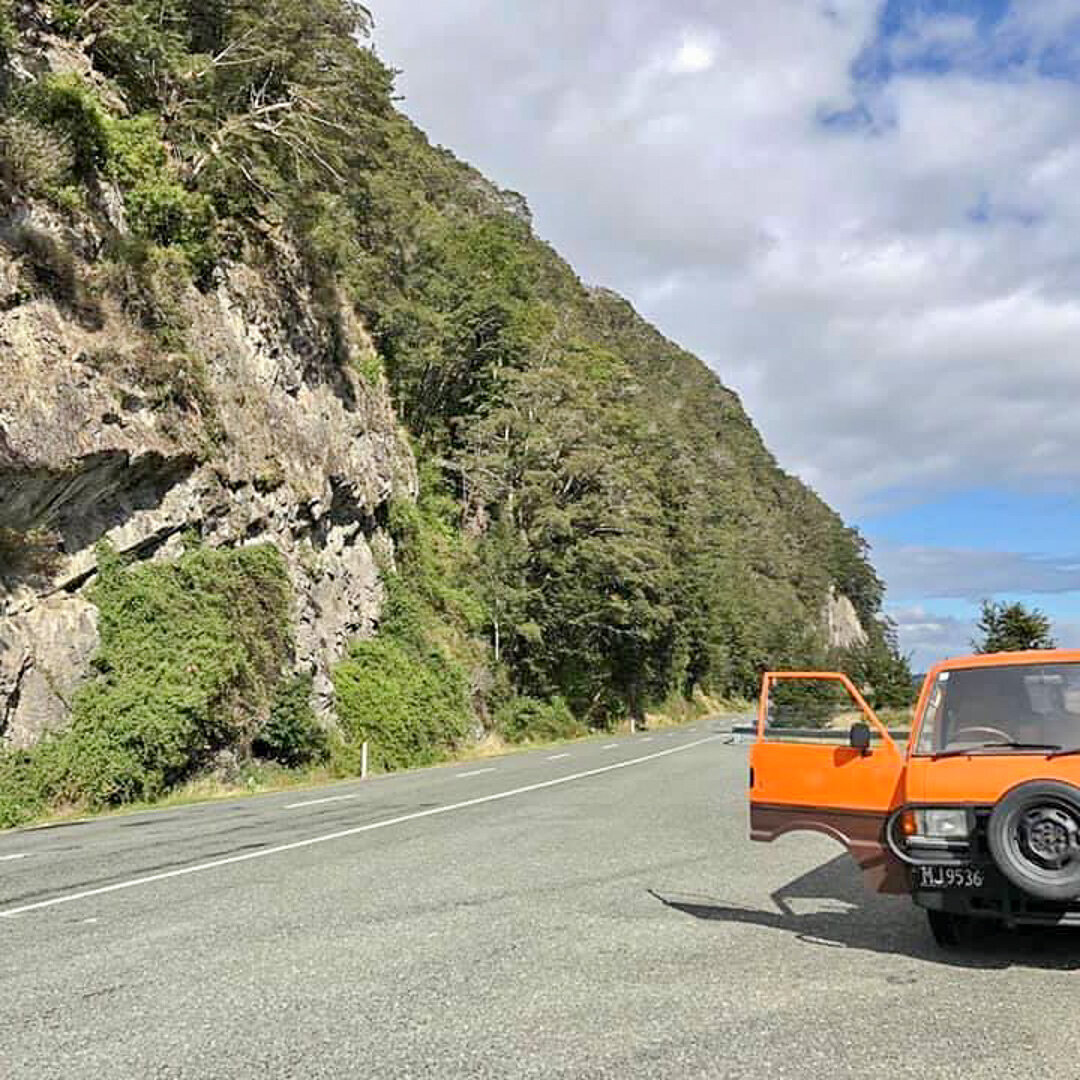
Pumpkin Wilhocki

She’s a 1985 Ford Econovan with a big nose, limited horsepower, and a lot of heart!
Building a Campervan in New Zealand
With Lauren starting work within a week of arriving in Auckland, I spent my days obsessively scrolling through campervan sale ads on Facebook. Countless hours flew by looking for the perfect campervan I could picture us living in for a month or two. We have spent many nights in cramped Airbnbs and hostel dorm rooms throughout our travels, but this will be the most confined space yet for us to share. Functionality of the space and reliability of the drive line were my top concerns, right after price. I seemed to find a fatal flaw in every potential campervan listing I looked at. Most of the vans with decent build outs were too expensive to justify the high kilometers. It didn’t take me long to realize I would have to build our own campervan for two simple reasons; I’m cheap, and it has been way too long since I have gotten to play with power tools.
Freedom Camping in New Zealand
In NZ there is something called the Freedom Camping Act which allows people to sleep in their vans so long as you have a self-contained certification. That sounds too good to be true right? Well it is, because there is one small catch. Each jurisdiction has their own control as to what extent to allow this. Some places are very strict and only permit you to stay overnight in designated car parks and will patrol them nightly, like in Wellington. Others are extremely relaxed and let you park overnight on any public property. All in all, it’s a fantastic law allowing travelers to find free places to spend the night all over New Zealand and in some very remote areas. Without this certification you must pay to park somewhere each night with basic facilities which can easily cost two people between $30-50 a night! Still cheaper than the typical hostel/motel/hotel room between $50-100 a night, but it can add up fast over two months.
So, what is the self-contained certification all about? Glad you asked mystery mate. In a nutshell it outlines certain things that need to be in the van and inspected by a certified person every four years for re-certification. For self-containment the van must have a sink, stove, trash can, potable water tank, grey water tank, a bed, and a toilet. A few years ago, they updated the rules to clarify that the toilet must be usable while the bed is made. I guess people were going potty outside the vans? This new rule certainly makes it harder to fit everything on the list into the van unless you have a long wheel base model which carry a premium of a few thousand dollars for the extra space.
Like I said earlier, I’m cheap. I wanted to spend no more than about $5,000 NZD ($3,250 USD) on a van for us and I wanted it to be functional and reliable. I really liked the idea of having one that converted to a couch and table inside knowing how it can rain at any second in NZ without warning. I also wanted a space for Lauren to cook where she would not grow frustrated with the lack of table space after only a couple days on the road. I really liked the idea of getting a long wheelbase model to give ourselves more room, but they were far above our price range so I would just have to find a way to make every inch count in our build.
Buyer Beware
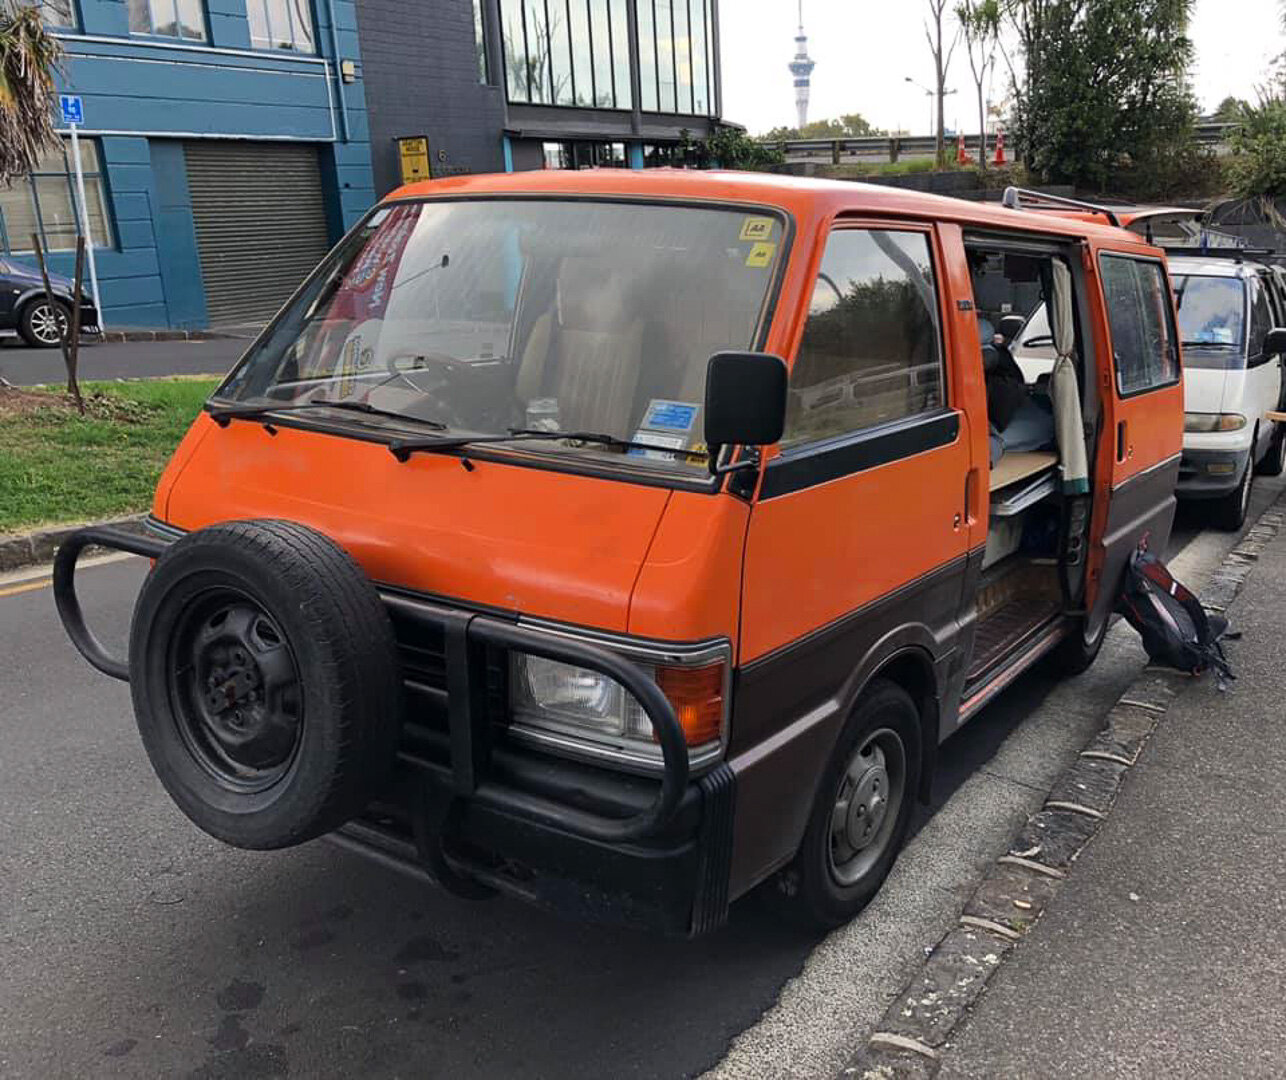
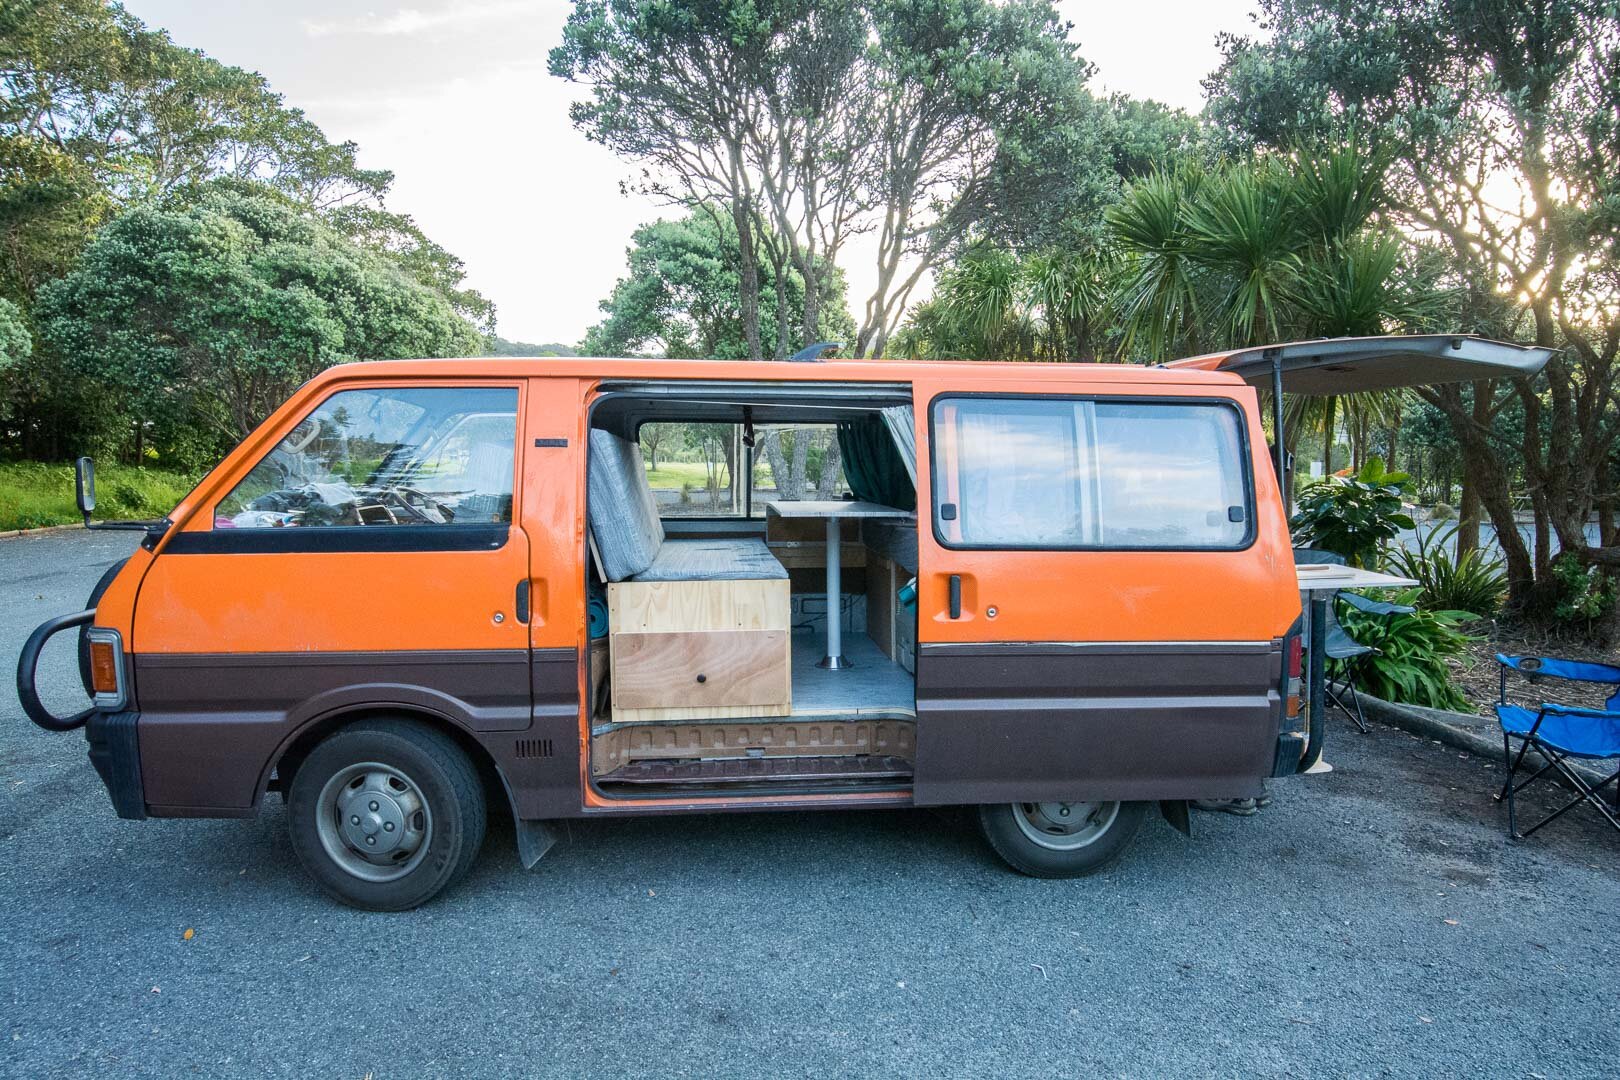
While my work visa application was processing, I found a few vans I got very serious about now that I was confident, I could stay in the country. I made a few inquiries and lined up a couple viewings. I had my eye on one in particular because it was under 200K km (120K miles) and the asking price was only $3,500. I rode my bike about 25 minutes to a park to meet the guy to take a look at the van. He said there were one or two other people coming to look at the van in the morning before me and would let me know if it sold so I could save myself the trip. My phone rang when I was about halfway there, so I figured it had sold. He said one of the people cancelled on him and the other just left and said they were thinking about it. When I got close it was easy to spot where he parked because the van was traffic cone orange. After a short conversation with the seller I started to look the car over for any deal breakers like frame rust, body damage, and engine knocking. The Warrant of Fitness (WOF) was due in about two weeks and he said it should pass with no issues because it has been very reliable for him. I said great I’ll buy it and since you are so confident it will pass could you take care of the WOF first and then we have a deal.
The buying and selling process of vehicles is scary easy in NZ. I say scary because there is no title to sign over and almost no one checking that a fair sale was made. It seems like somebody could just put your car in their name without you knowing. I even read stories online of just that thing happening, people selling vans that were not theirs. Always get a vehicle history, which we did, and it helped debunk several parts of the seller’s story that let me knock down his price the extra bit at the end. For instance, he said he was the 2nd generation backpacker to live in the car. He was the 12th. I believe he was just repeating the bullshit story that was concocted by whomever he bought the car from, but still it was fun to see the look on his face when I had disproved most of his post and questioned everything else for good reason.
I have from memory typed the essence of his listing.
Self-contained second-generation backpacker van with low km’s. The van was owned by a sweet old lady for many years who took great care of the car. The engine has been replaced already and has been very reliable so no worries on your travels! The inside of the van was built recently so everything is still very new.
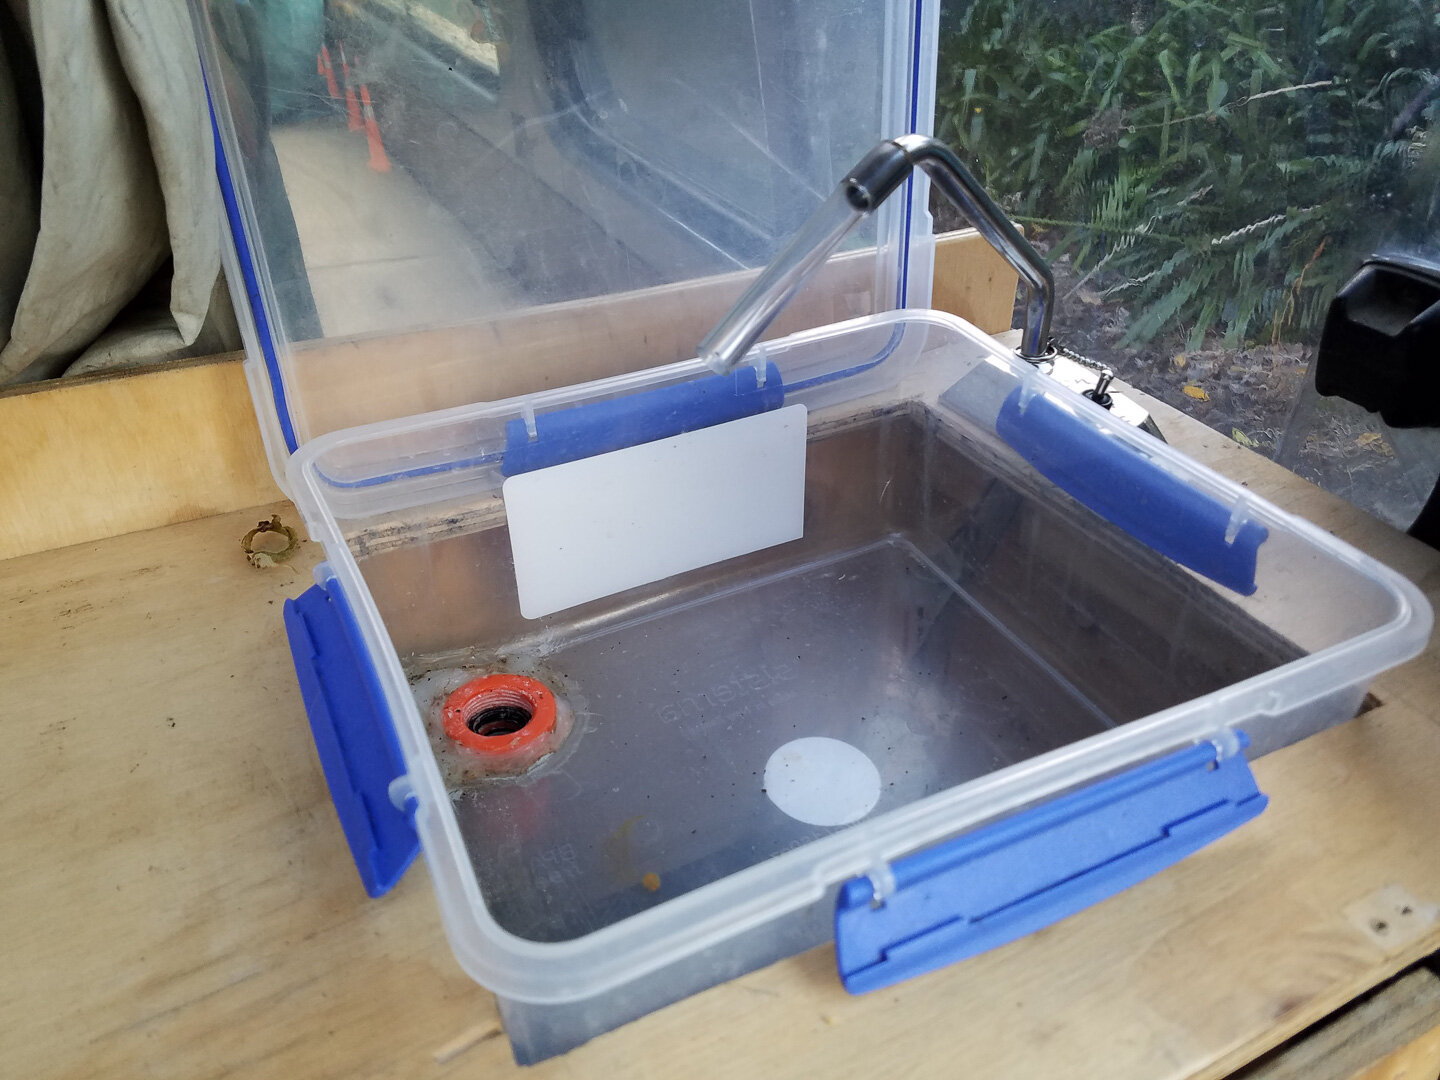
Here are some more pictures of Pumpkin. Poor girl had a large Tupperware container for a sink with a garden hose fitting as the drain.

About a week later he called me and said it had failed the inspection. Perfect it’s exactly what I was hoping for. Either he would have to spend the money to fix it or I could low ball him on the price. He offered on the phone to drop his price to $3,000 to make the sale. I told him I wanted another look at the van before I decided because the vehicle history and his sale description didn’t add up, and I wanted a closer look at a few things. His listing said the motor had been replaced which seemed unusual with the lower mileage unless something severe had happened. I tried my hardest to visually inspect the motor for any signs of replacement and could see none. He also didn’t have any record of the work which seemed strange since there was a pretty decent record of receipts for the vehicle history. I was more worried that somebody had replaced the motor and I would have a terrible time figuring out what was put in the car to do any repairs. I tried to get him down to $2,500 which in all honesty would have been giving it away but it made me feel more comfortable given all of the uncertainty with the vehicle history. We split the difference at $2,750 NZD. I spent another $300 to pass the WOF and replace a tire that was nearly bald. Not bad though, I had my van with a self-contained certification, low kilometers, and loaded with gear like the stove, travel fridge, cookware, dishes and more.

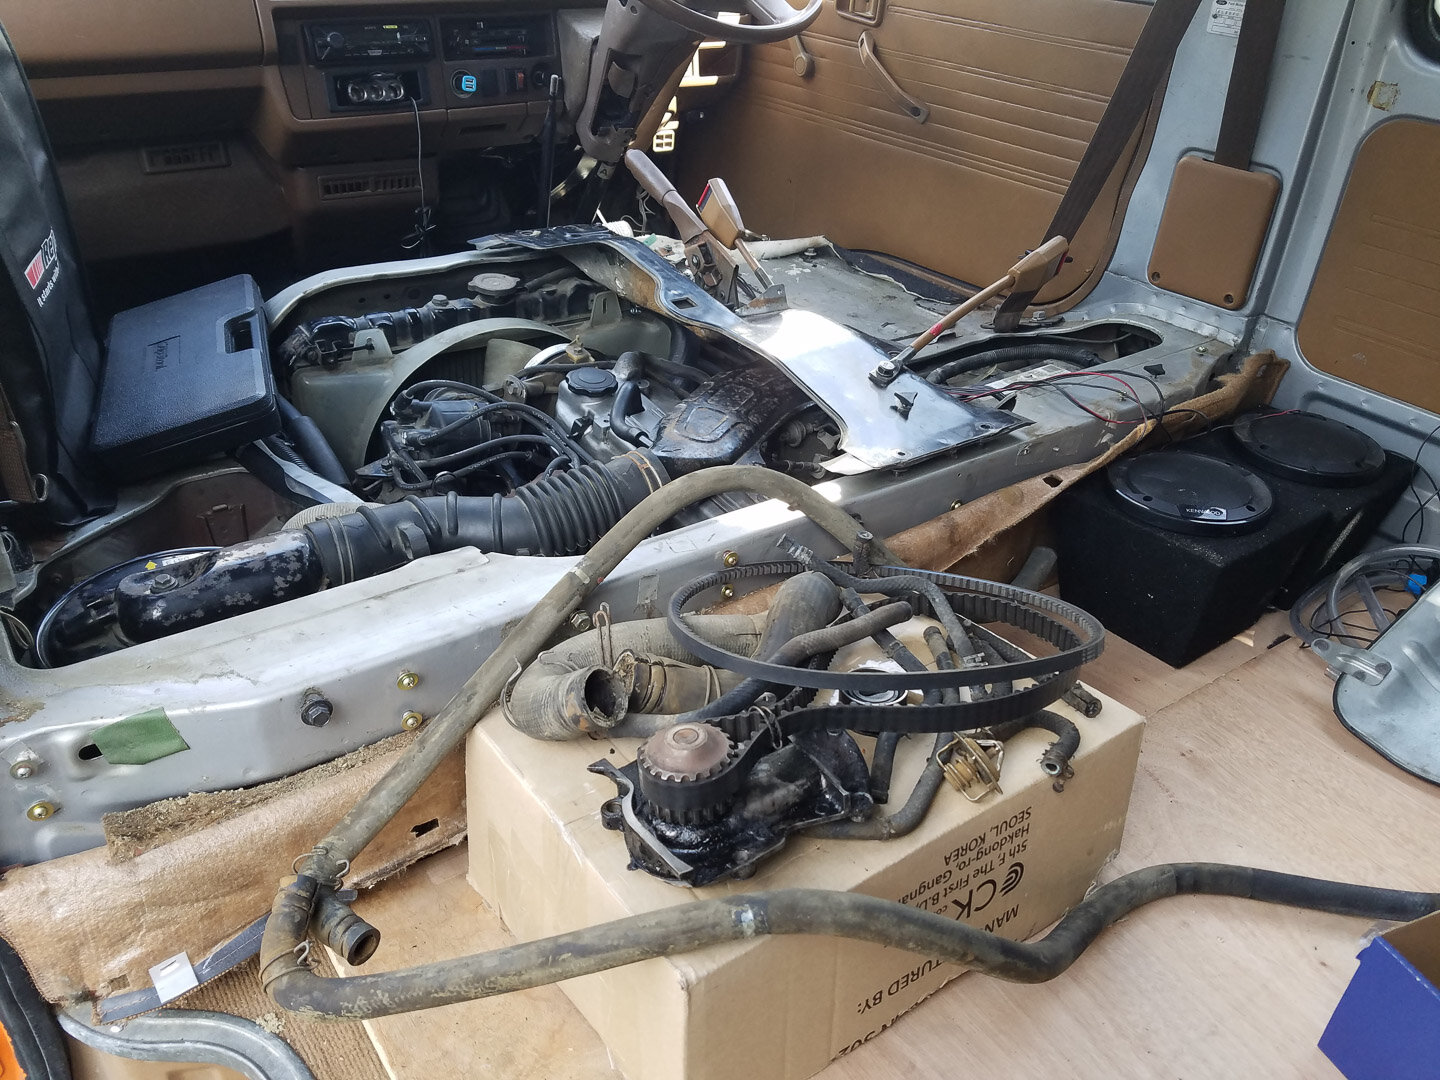
I didn’t spend much time looking at the inside of the van when I bought it because I knew once I had one peek that I was ripping everything out and starting from scratch. I did notice however that the original build had used some very nice and expensive plywood with a birch veneer so I hoped to reuse as much as I could to save costs.
Where to do all the building work?
Ironically right about the time I bought the van my work visa got approved and I had a solid start date two weeks out. While I had been looking at vans, I had also been trying to figure out how and where I would do the work to build the van. We had a parking space in a secure lot at our apartment where I could do some work, but I worried the neighbors might complain about the noise. Initially I figured I would have to spend $300 to buy a power drill and skill saw to do all the work and just be limited by the battery life for how much I could do in a day.
One day an epiphany struck and I thought that maybe, just maybe, they could have a community workspace like the one Chris Reed from VIKA told me about in Arlington. Sure, enough after a quick Google search, I found a maker space nearby called Hackland with everything I would need. However, the space looked small and it was a weekly fee of $20 so I would need to work fast to make it worth it. As I continued to look for community spaces in Auckland, I also found a tool library where you could pay a flat monthly fee and rent tools for a week at a time. It was when I stumbled on the poorly advertised Men’s Shed that I got really excited. It looked spacious, had all the tools I would need, and the best part was the $100 annual fee! There was one drawback however, it was only open a few days a week and once I started working, I would be limited to doing most of my work on Saturdays. One visit to the Men’s Shed and I didn’t care about the limited hours, I was in heaven. It had every wood working tool I could possibly need and an arsenal of power drills and saws to keep everybody happy. It also had an “engineering” wing which is their way of saying metal working with lathes, drill presses, metal saws, welders, and a plasma cutter! This is now my retirement plan to live nearby one of these.
Vehicle Maintenance is a Must!

The completed works. That’s about as shiny as that motor is ever going to be!
I had two weeks until I start working and I wanted to do quite a bit of mechanical maintenance to the engine first and then build out the interior from my rough hand sketches. I laugh in hindsight at how optimistically naive I can still be at times when my enthusiasm disregards any and all logic. I thought I could get it all done in two weeks before I started working if I worked on it full time. I am not even going to get into the countless reasons why this would have never happened in my wildest dreams I’ll just put this one on the record and say, “Lauren, you were right.” That always stings a little when I say it.

In total it took us five months with the last two months working on it almost every spare second. I wanted to do all the mechanical maintenance before starting the build out because the engine sits beneath the front seats. I spent at least two weeks agonizing over finding a repair guide to look at for the timing belt before I broke the engine down and got myself stuck. I suppose at this point it would be convenient to know the type of vehicle I bought; it is a Ford Econovan. Almost sounds familiar with the Ford E series of vans like the E100 and so on. However, This little model was never produced in the US and was only built in NZ and Australia. I scoured the internet for something showing me what was involved with replacing the timing belt and found nothing. A millennial turned up nothing of value in an internet search, I’m so ashamed. I think at this point in my life I owe Scotty a trip around the world for all the favors he has done me over the years. He somehow always helps me find the answer when I’m in a pinch with a car repair. My Dad went over to Scotty’s shop to ask him for help, and when he could not turn up anything in the US car repair databases, he told my Dad about his mechanic friend in Australia. He helped me connect with his buddy Glen who was able to find the car in his database over in Australia and sent me a repair guide that made me feel comfortable with getting the job started.

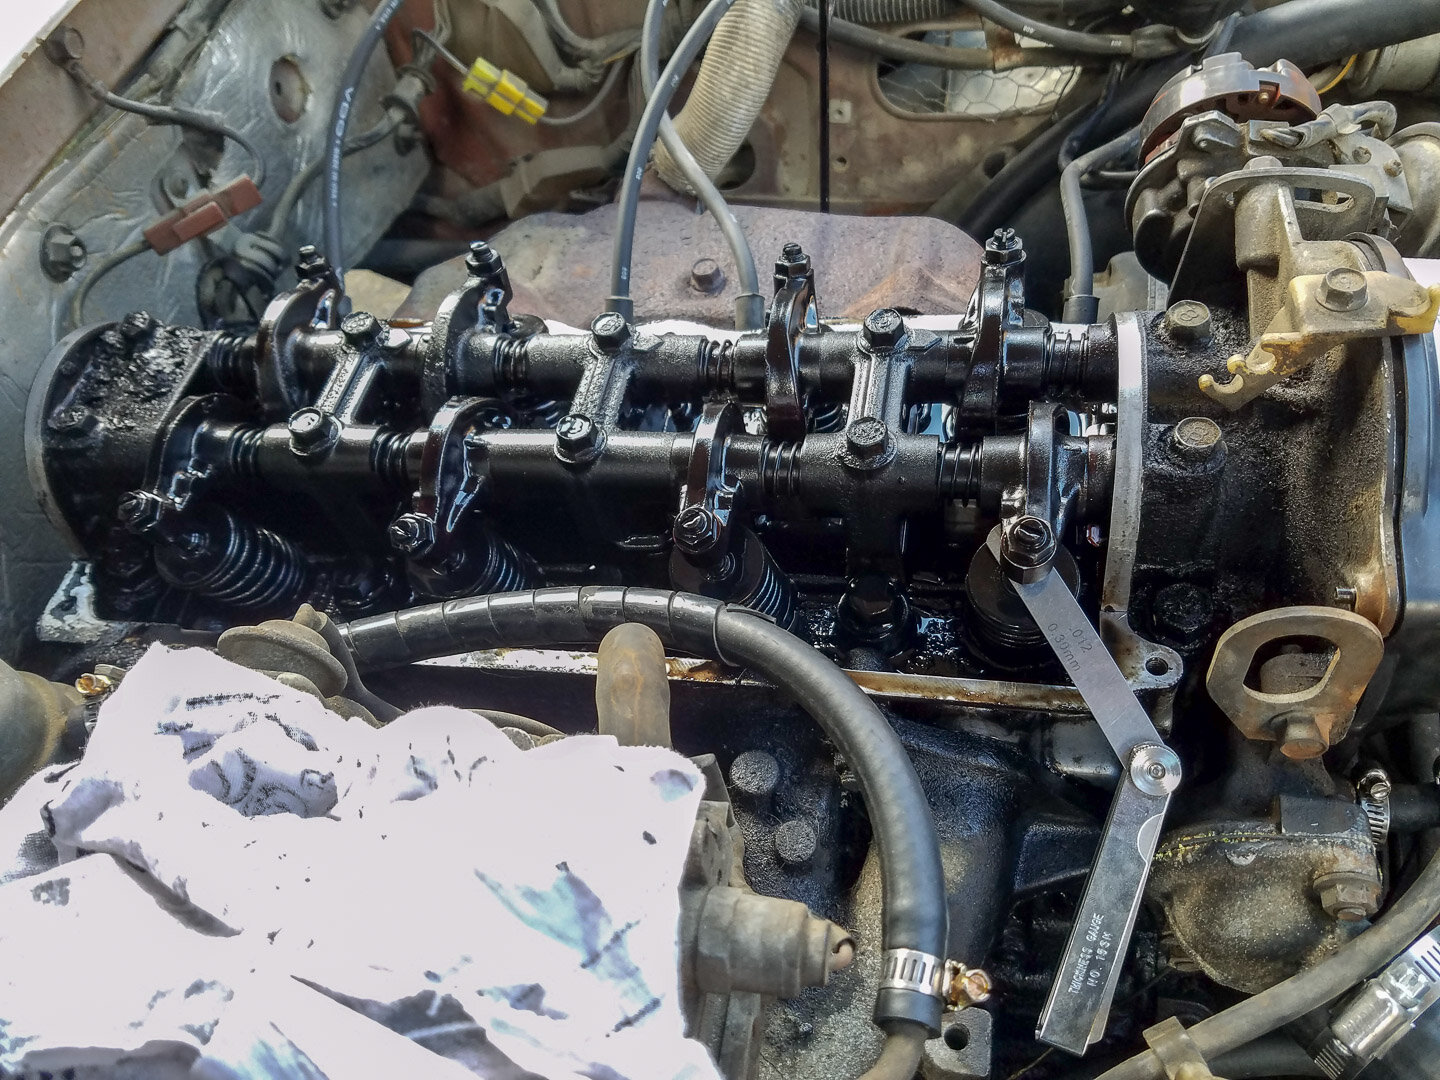
It took me a month to replace everything on the motor I wanted to fix. This was not because it was a months’ worth of labor. I played car part roulette several times trying to find the correct parts from three different parts shops. I’ll summarize all the work so as not to bore or lose everyone: timing belt, T-belt idler, water pump, valve cover gasket, adjusted valves, thermostat, upper & lower radiator hoses, both heater hoses, three coolant bypass hoses, three fuel lines, one vacuum line, alternator belt, transmission fluid, and an oil change. In total I put about $1,000 of parts into the car which would have cost easily three times that to have the work done somewhere. I did it myself because of a deep distrust for other people working on my vehicles. Plus, I’m cheap so if I can do it myself and save money I always do! I also have a much higher level of confidence in the mechanics of the vehicle after going through everything myself.
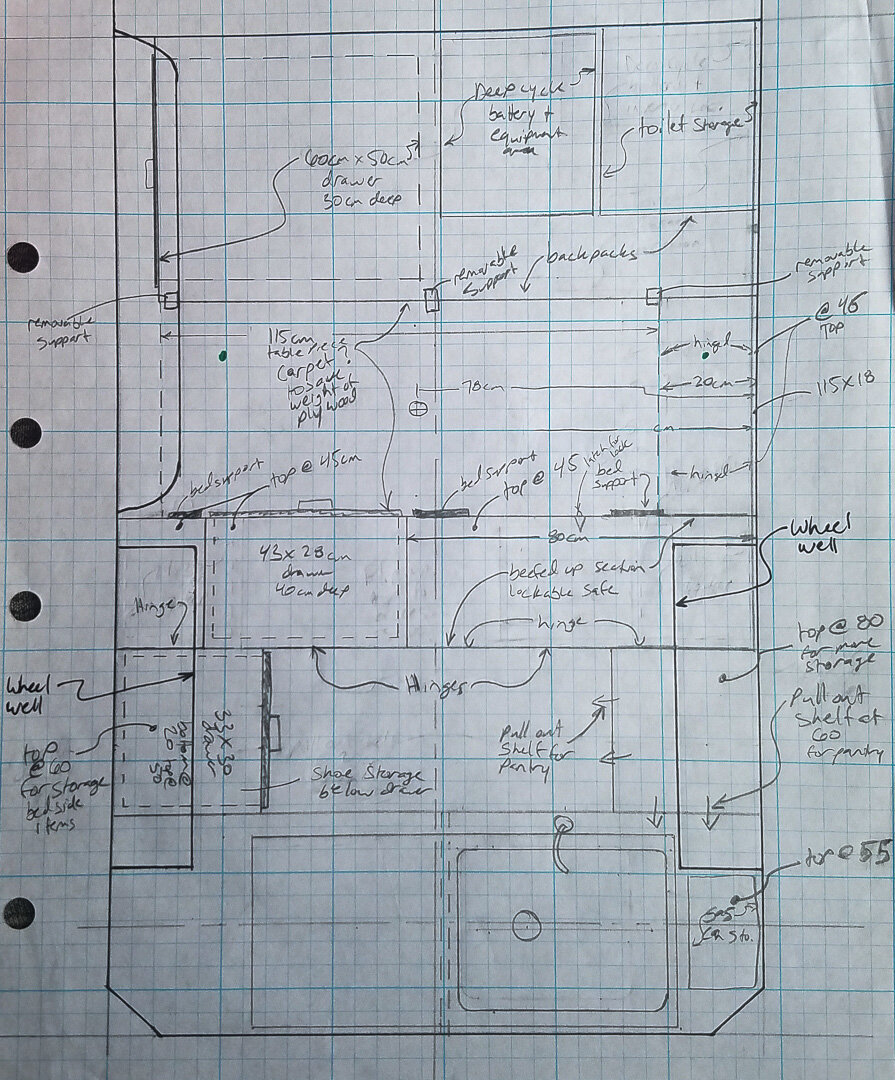
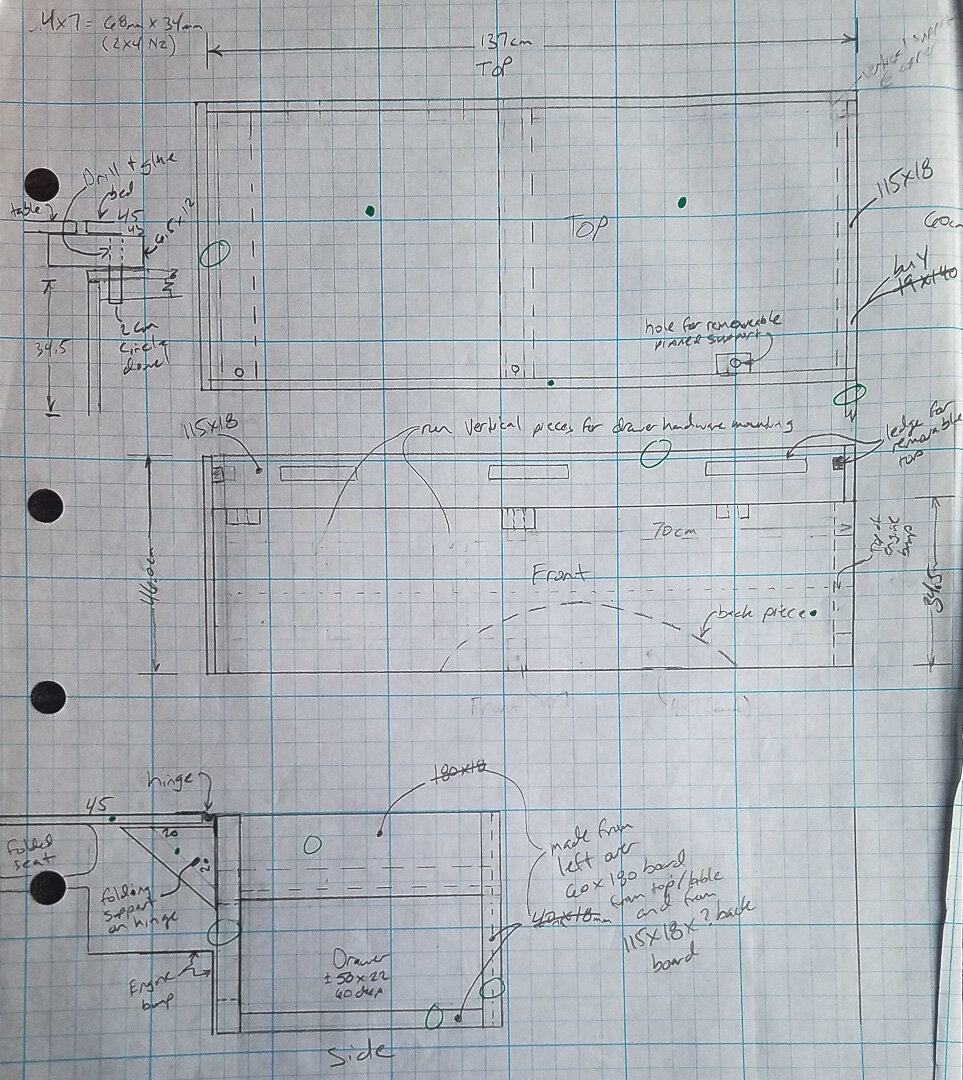
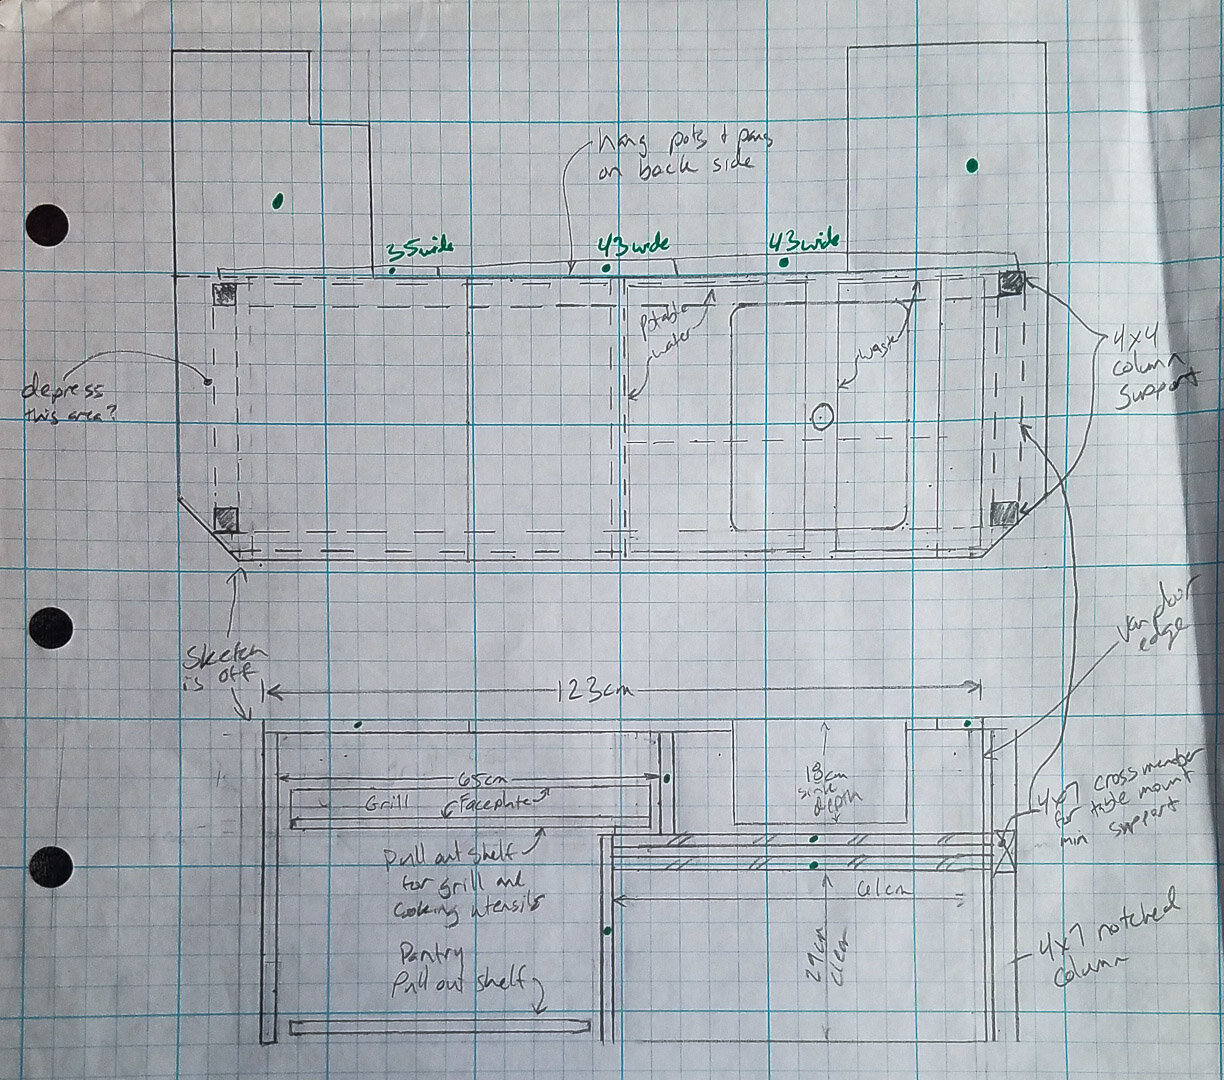
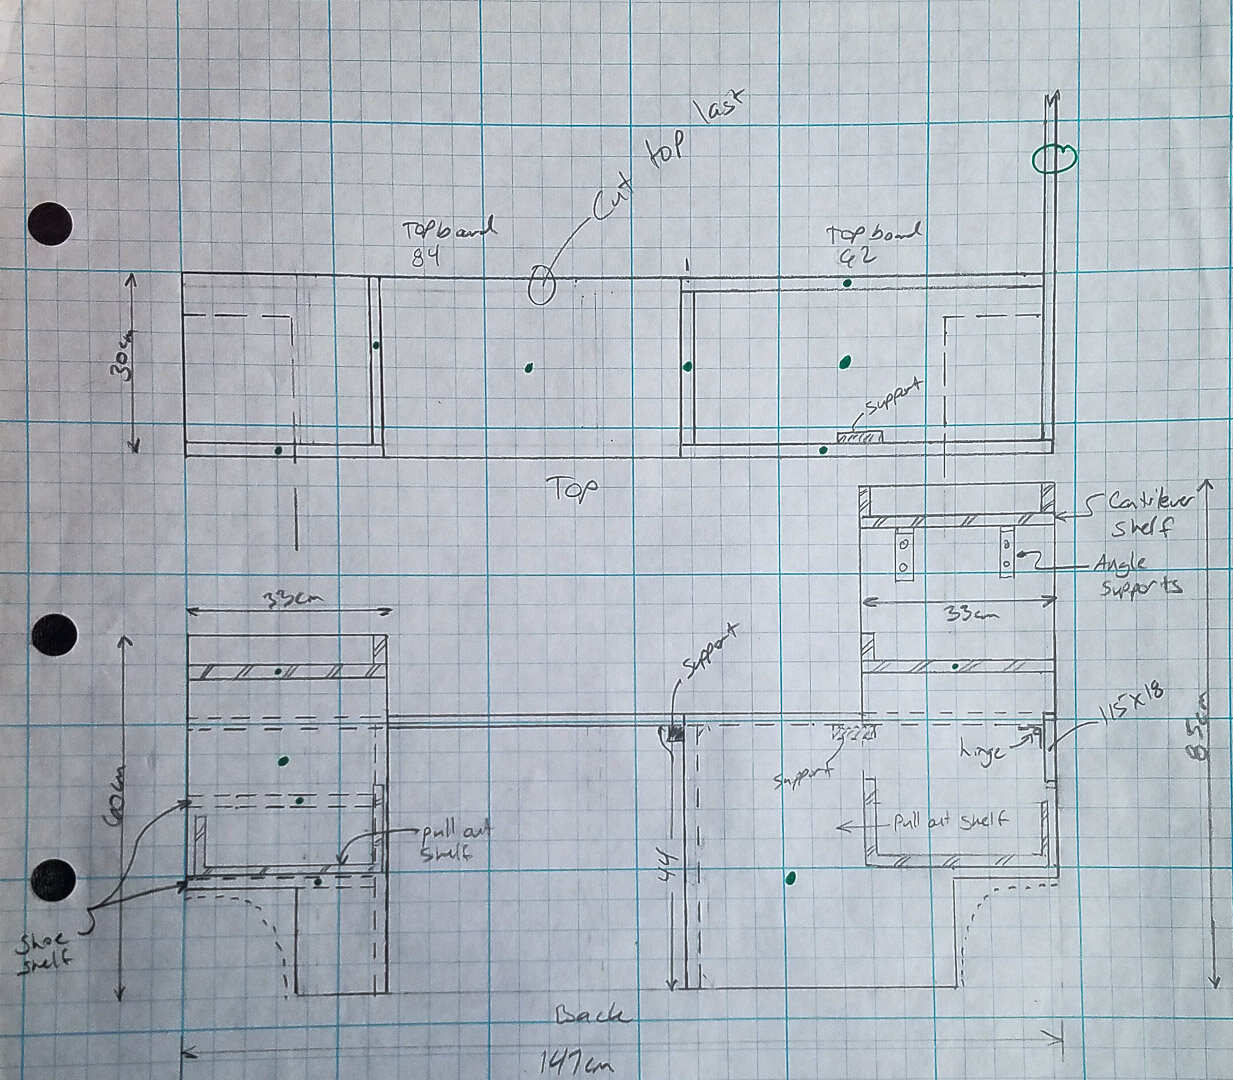
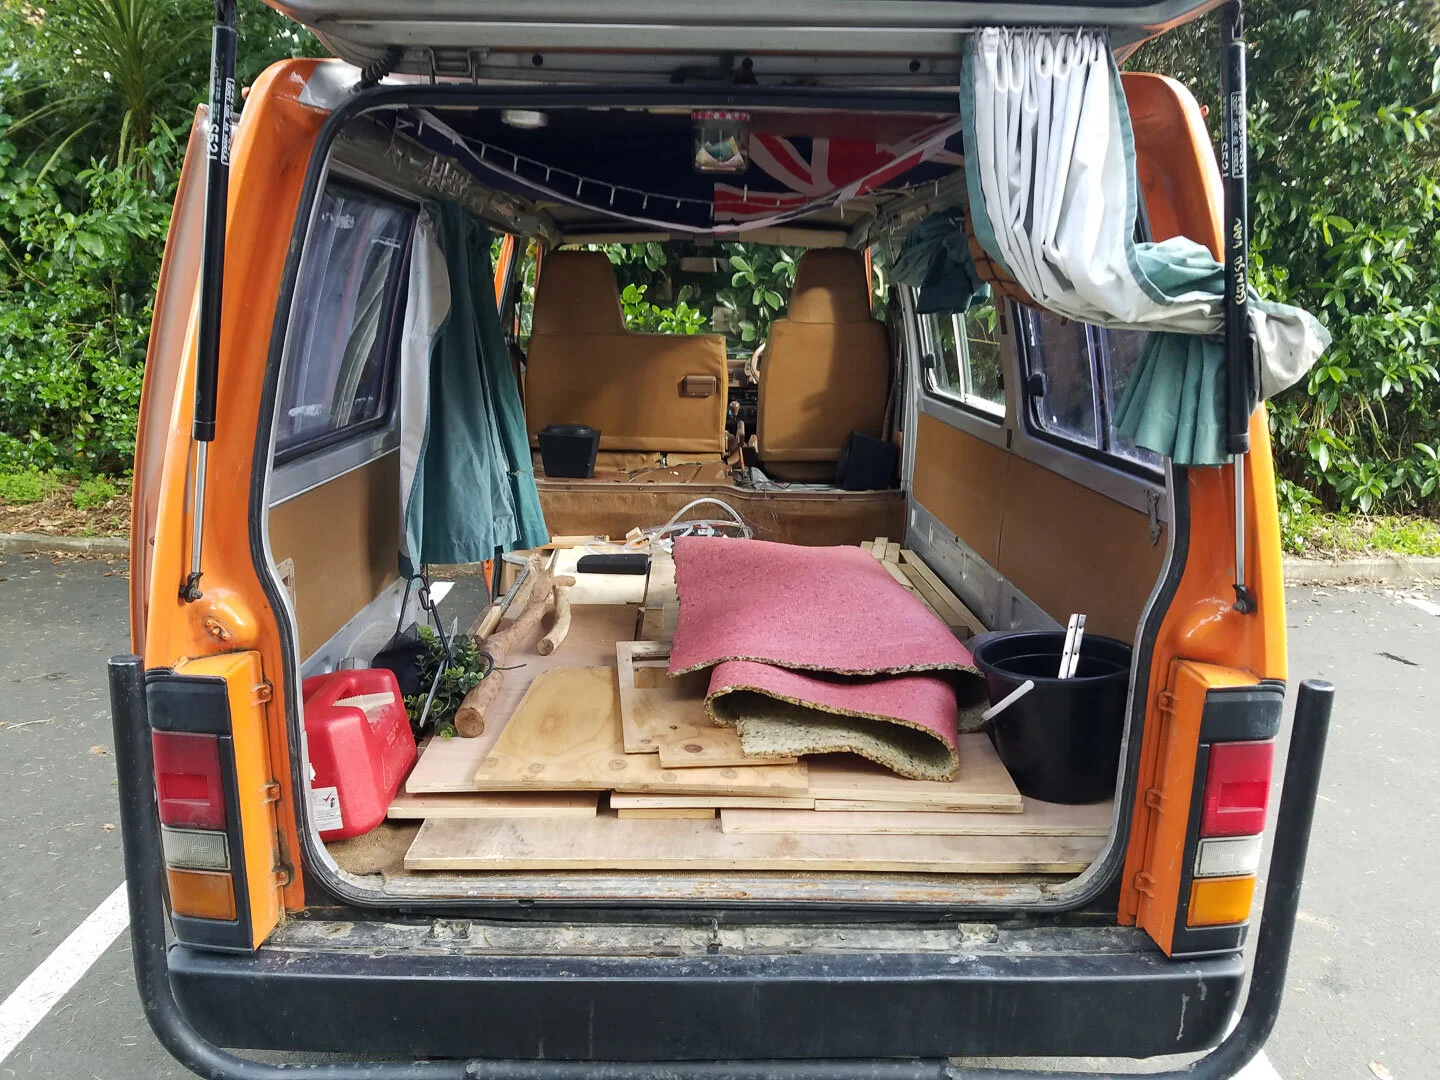
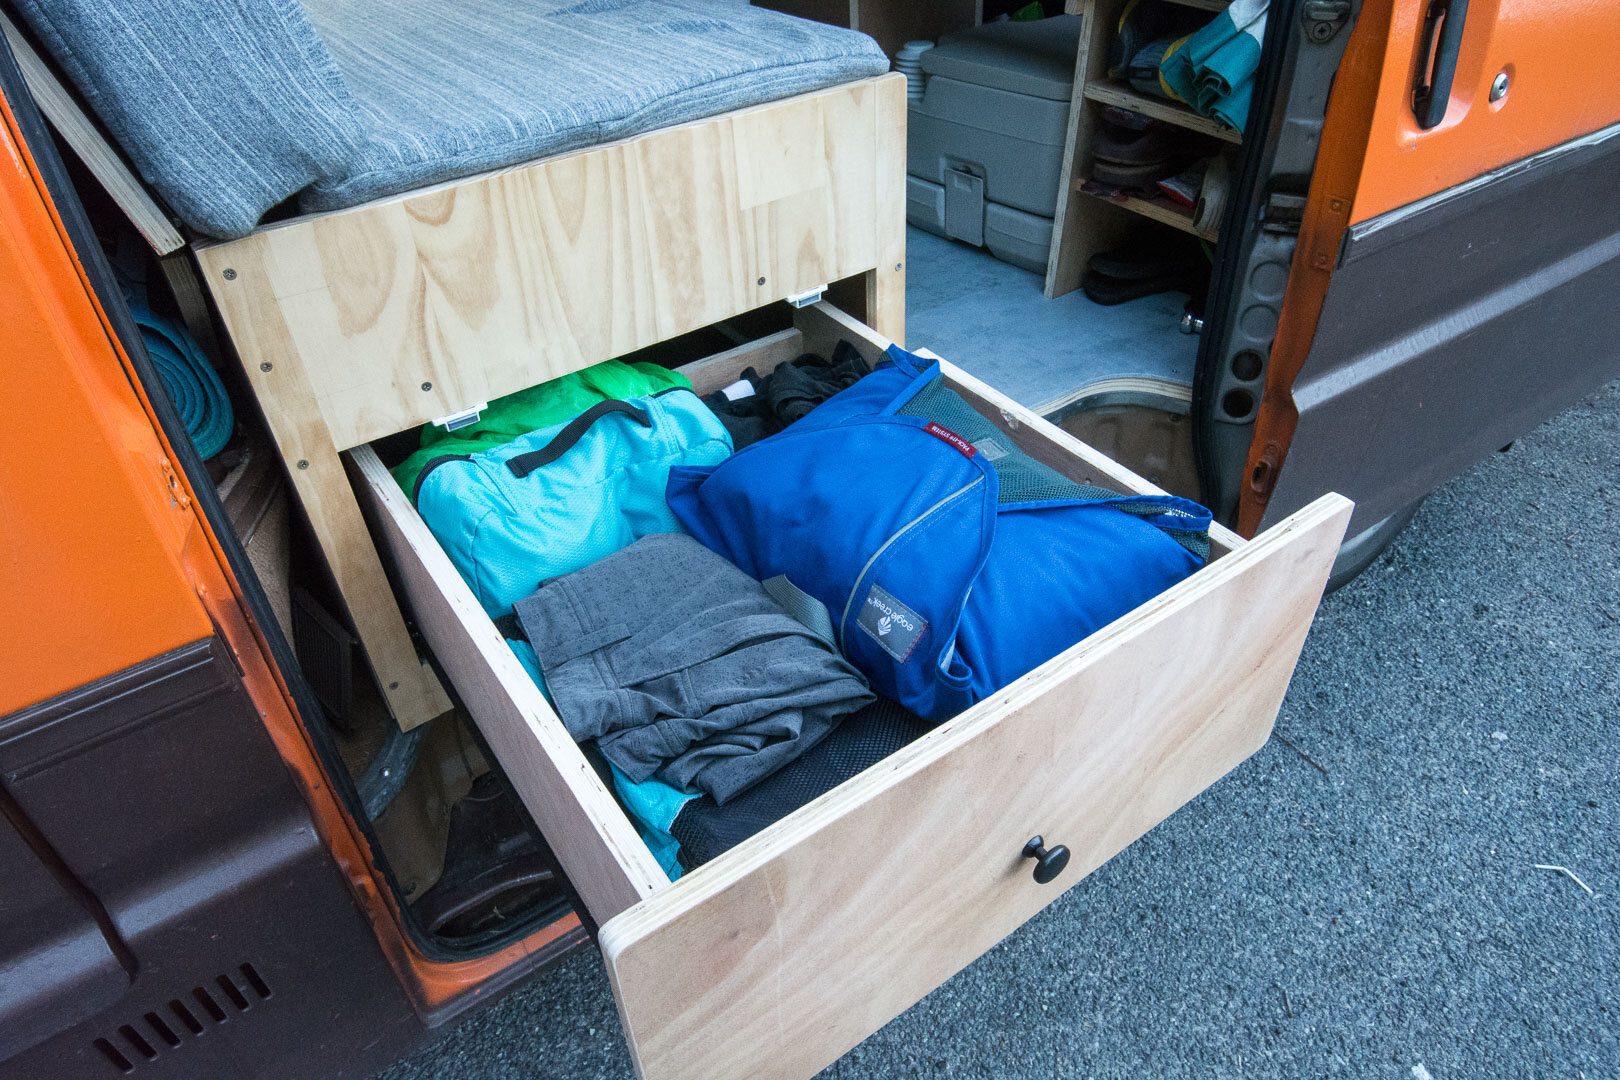
All the while that I was working on the engine, I spent my time at night working on my drawings of the interior. I basically knew my general concept from the start, but continually tweaked the design mentally and on paper before I started as I learned from Dad W. It’s amazing how much detail you have to consider when building anything from scratch and it’s the details that will often hang you up the most and cause concessions in the quality. Spousal sign off was also a time-consuming process. I think I spent about a month in total detailing the design on paper. My urge to start playing with power tools was overwhelming but before I got started I still had to catalog the wood that came out of the car and figure out the most efficient way of cutting up each piece. It was a puzzle to solve and I knew I had to have it all figured out before I started because this was expensive plywood and mistakes would be costly.

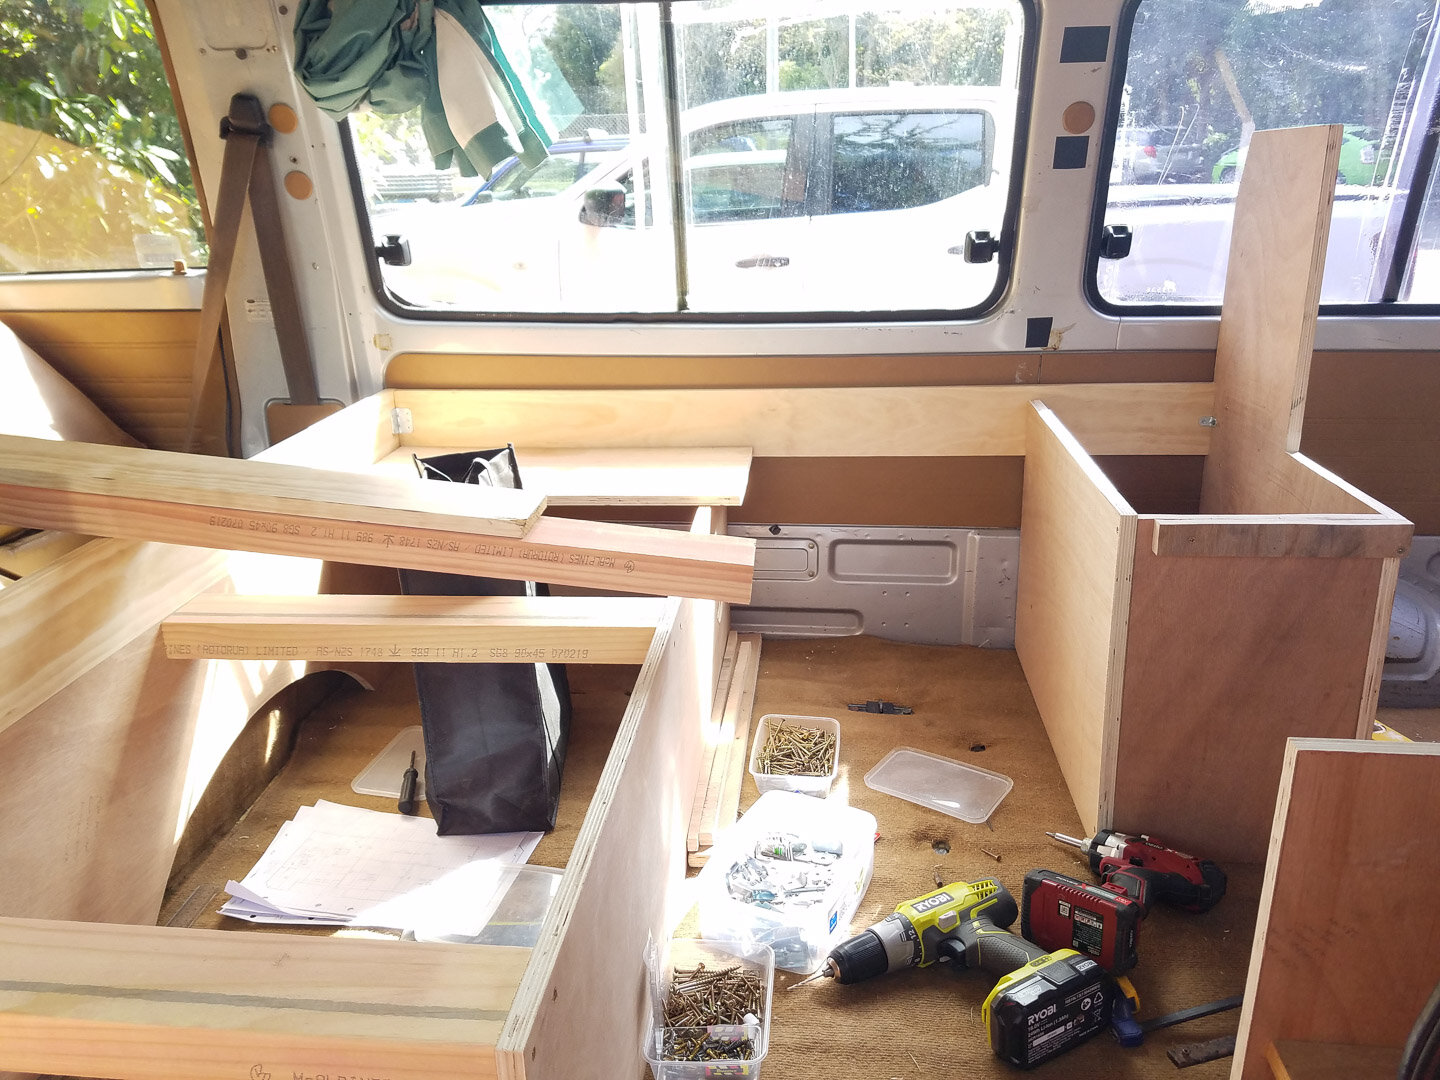
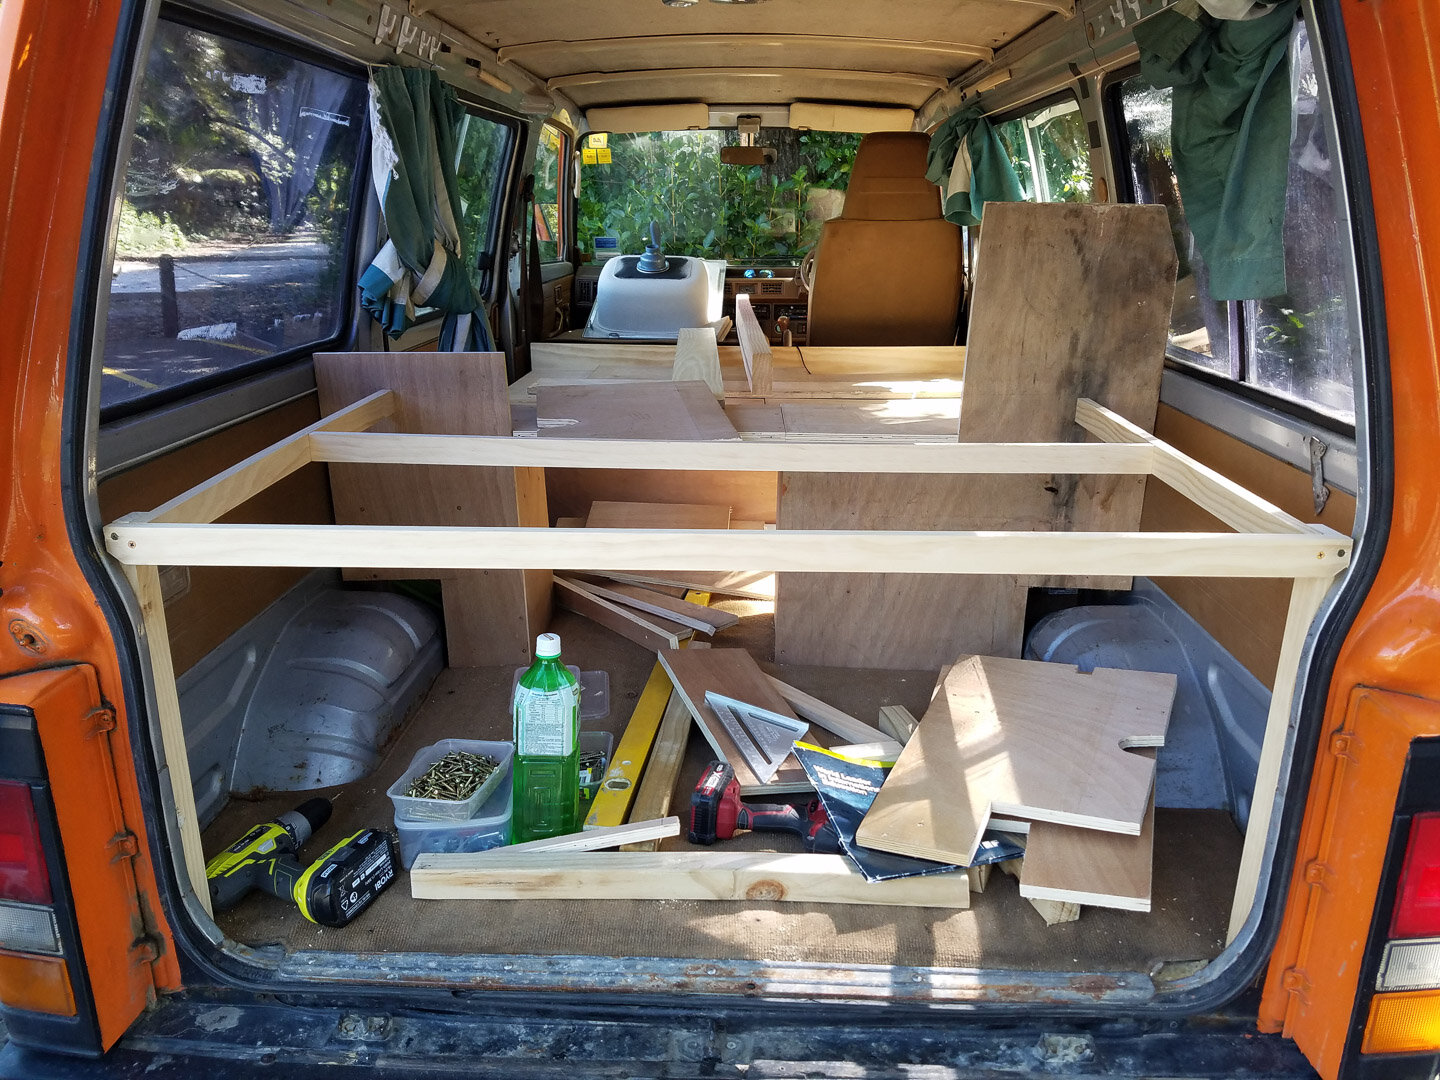
The Van Build Out
Once again, my naivety and enthusiasm took over when I thought I could complete the build out in a month or two at most if I worked hard every weekend. It took four months to build out the interior. I think reality sunk in after a couple weeks when progress was slow. I always forget that I’m a perfectionist when I am forecasting my time on projects. I didn’t really mind taking longer on the build because it was giving me something to look forward to every weekend with Lauren and I on opposite schedules. She was working every weekend and had her days off during the week. I also didn’t mind making extra trips to their version of the Home Depot, called Bunnings Warehouse. In the height of the build I was going to Bunnings every other day, and I loved it! I think subconsciously I would sometimes intentionally forget something just so I could go back the next day. There have been precious few excuses for me to visit hardware stores while we have been traveling. A couple times I made Lauren walk in one with me just so I could take a look around and a good sniff for a lumber fix. If you think a hardware store smells good you have got to give the Men’s Shed a good sniff. That sounded wrong let me explain. The moment you walk in, your nose picks up so many different varietals of freshly cut lumber that your toes curl with glee. Twenty minutes later your nose is fully clogged with saw dust, but you don’t care because you have a power tool in each hand revving at full bore and grunting like the Tool Man.


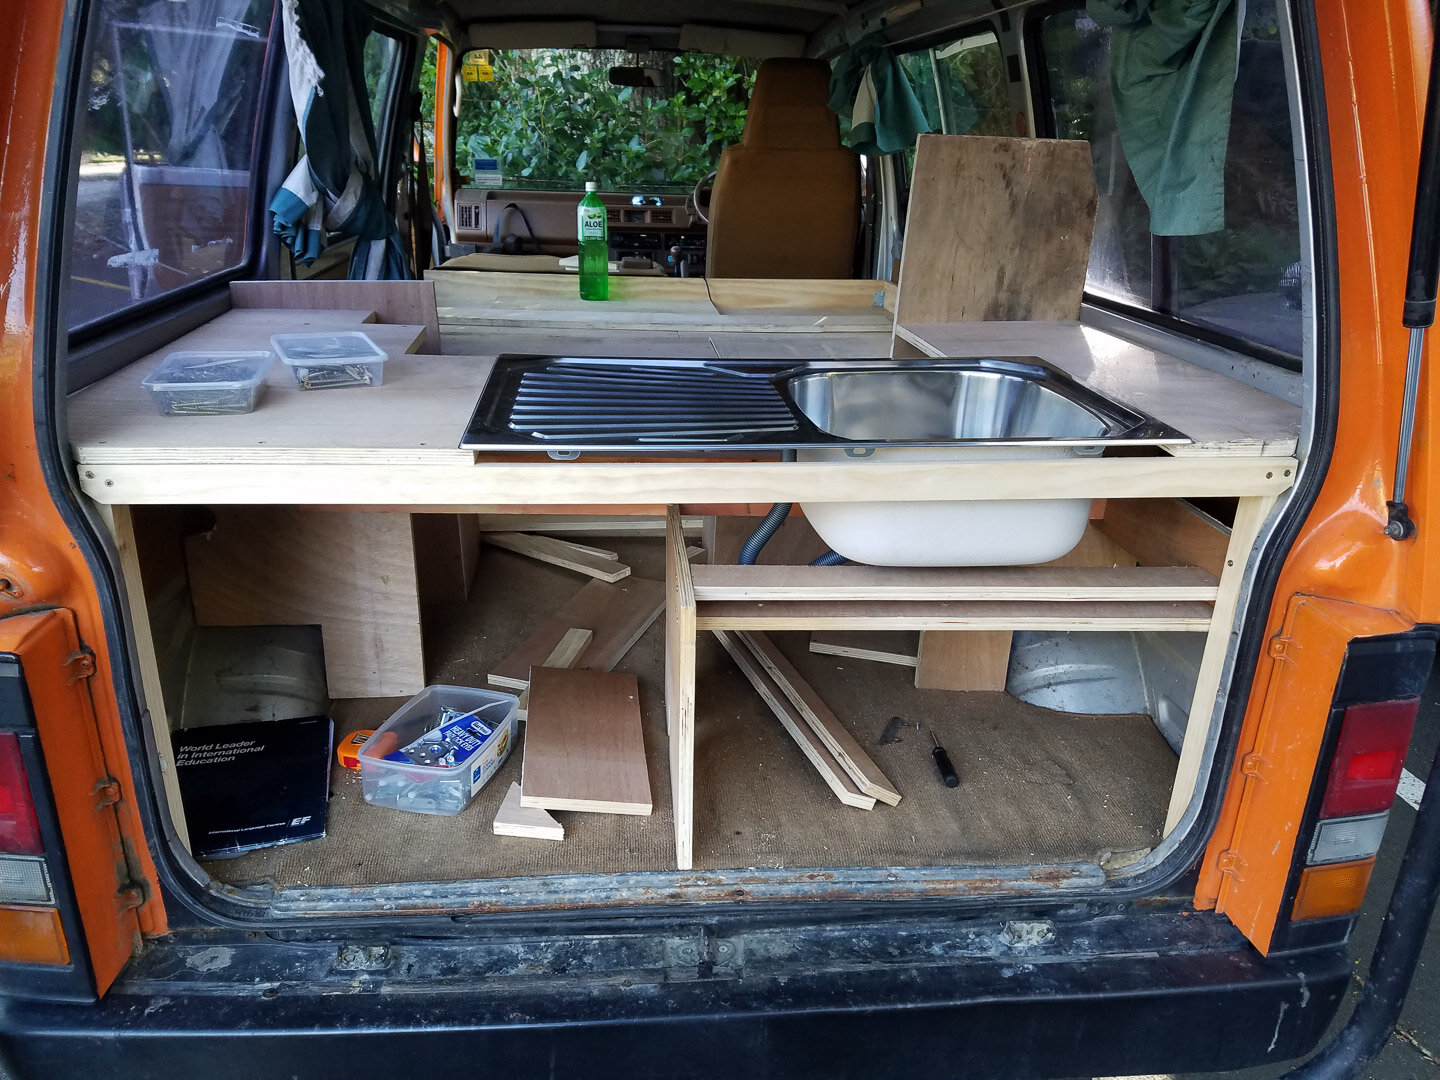
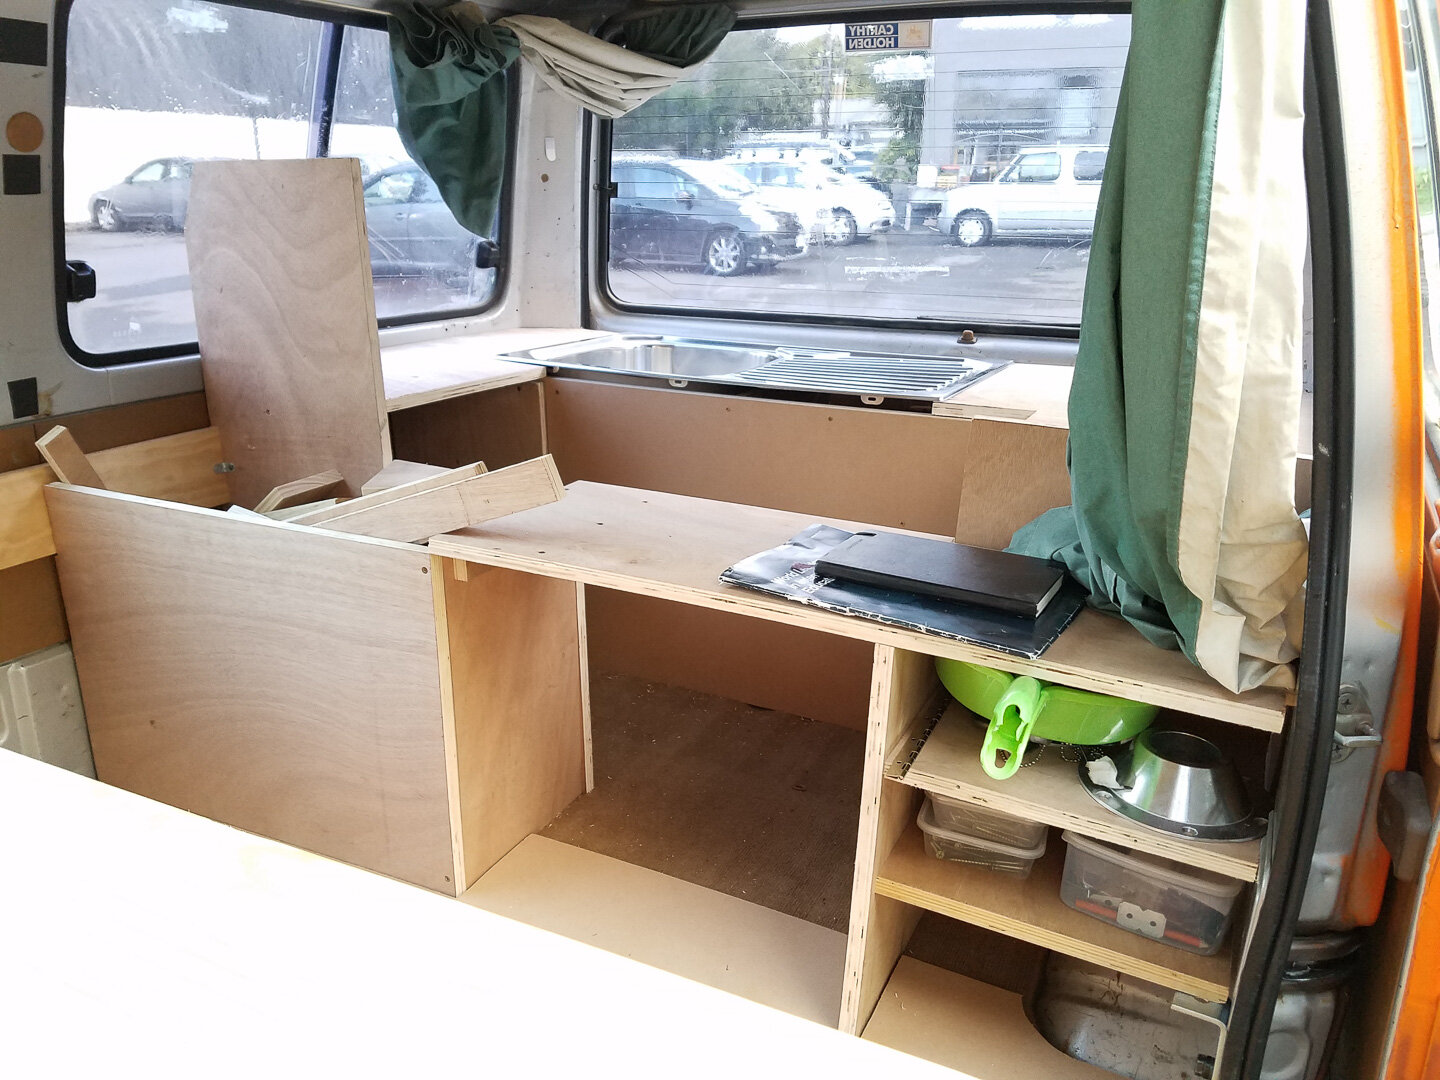


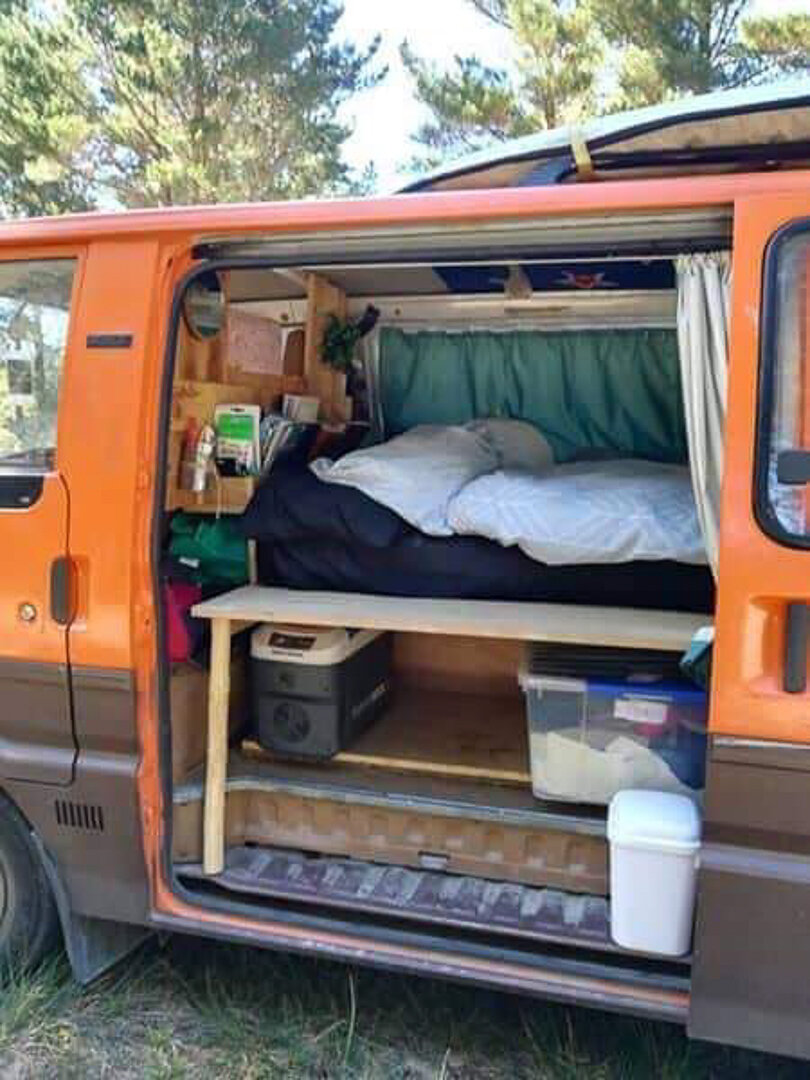
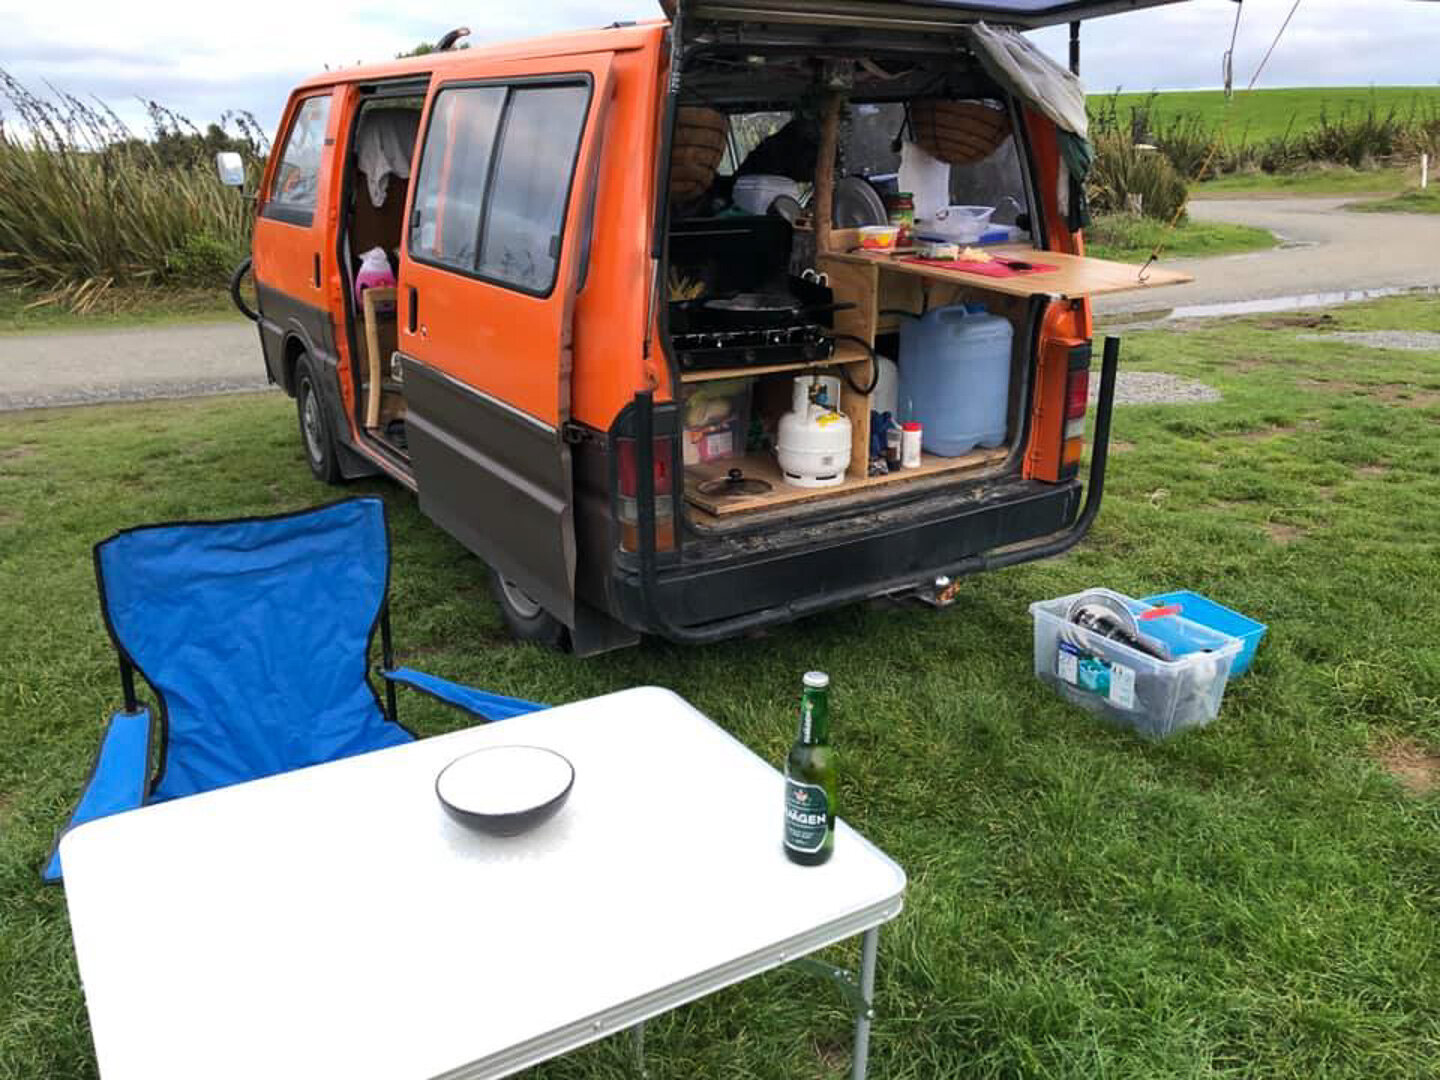
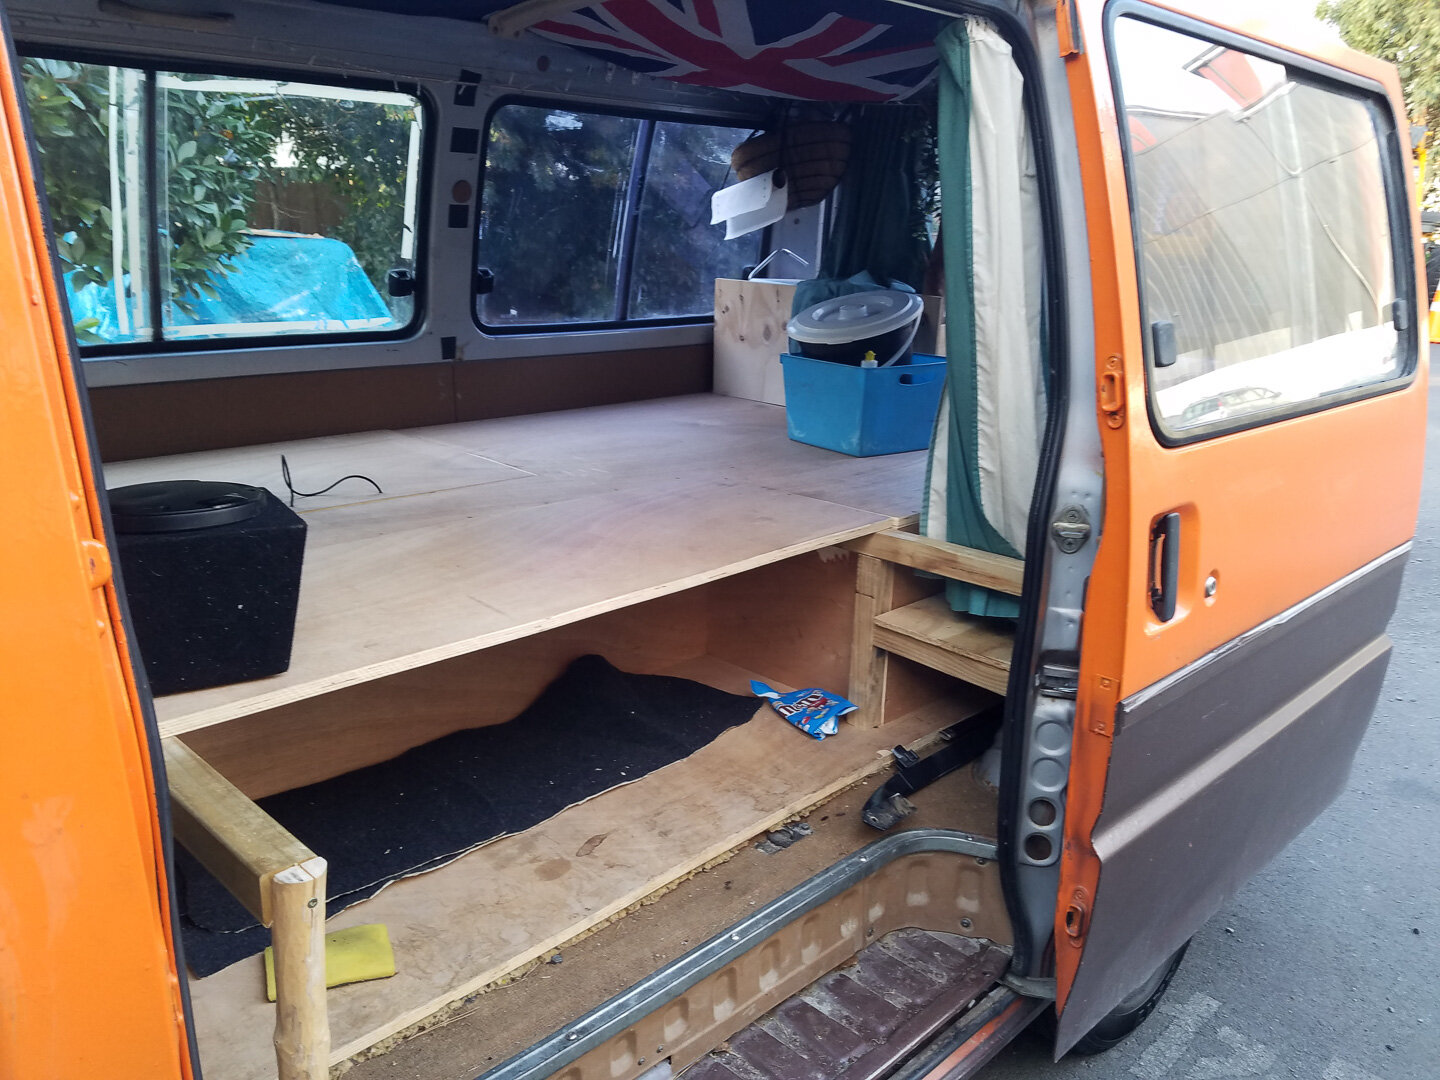
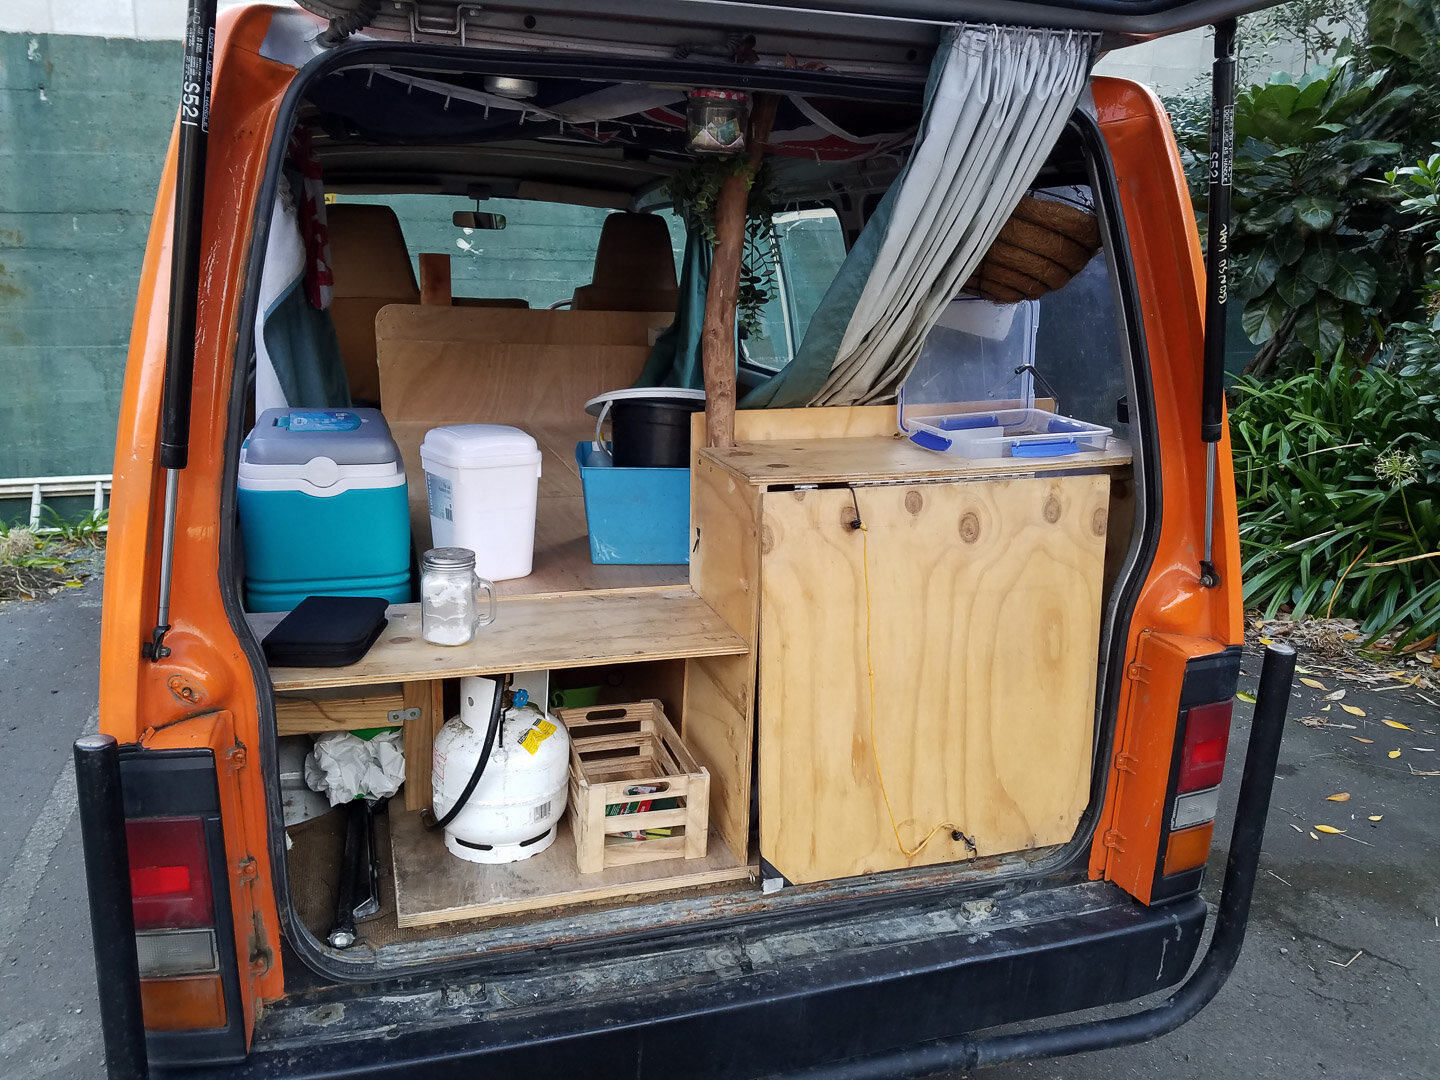
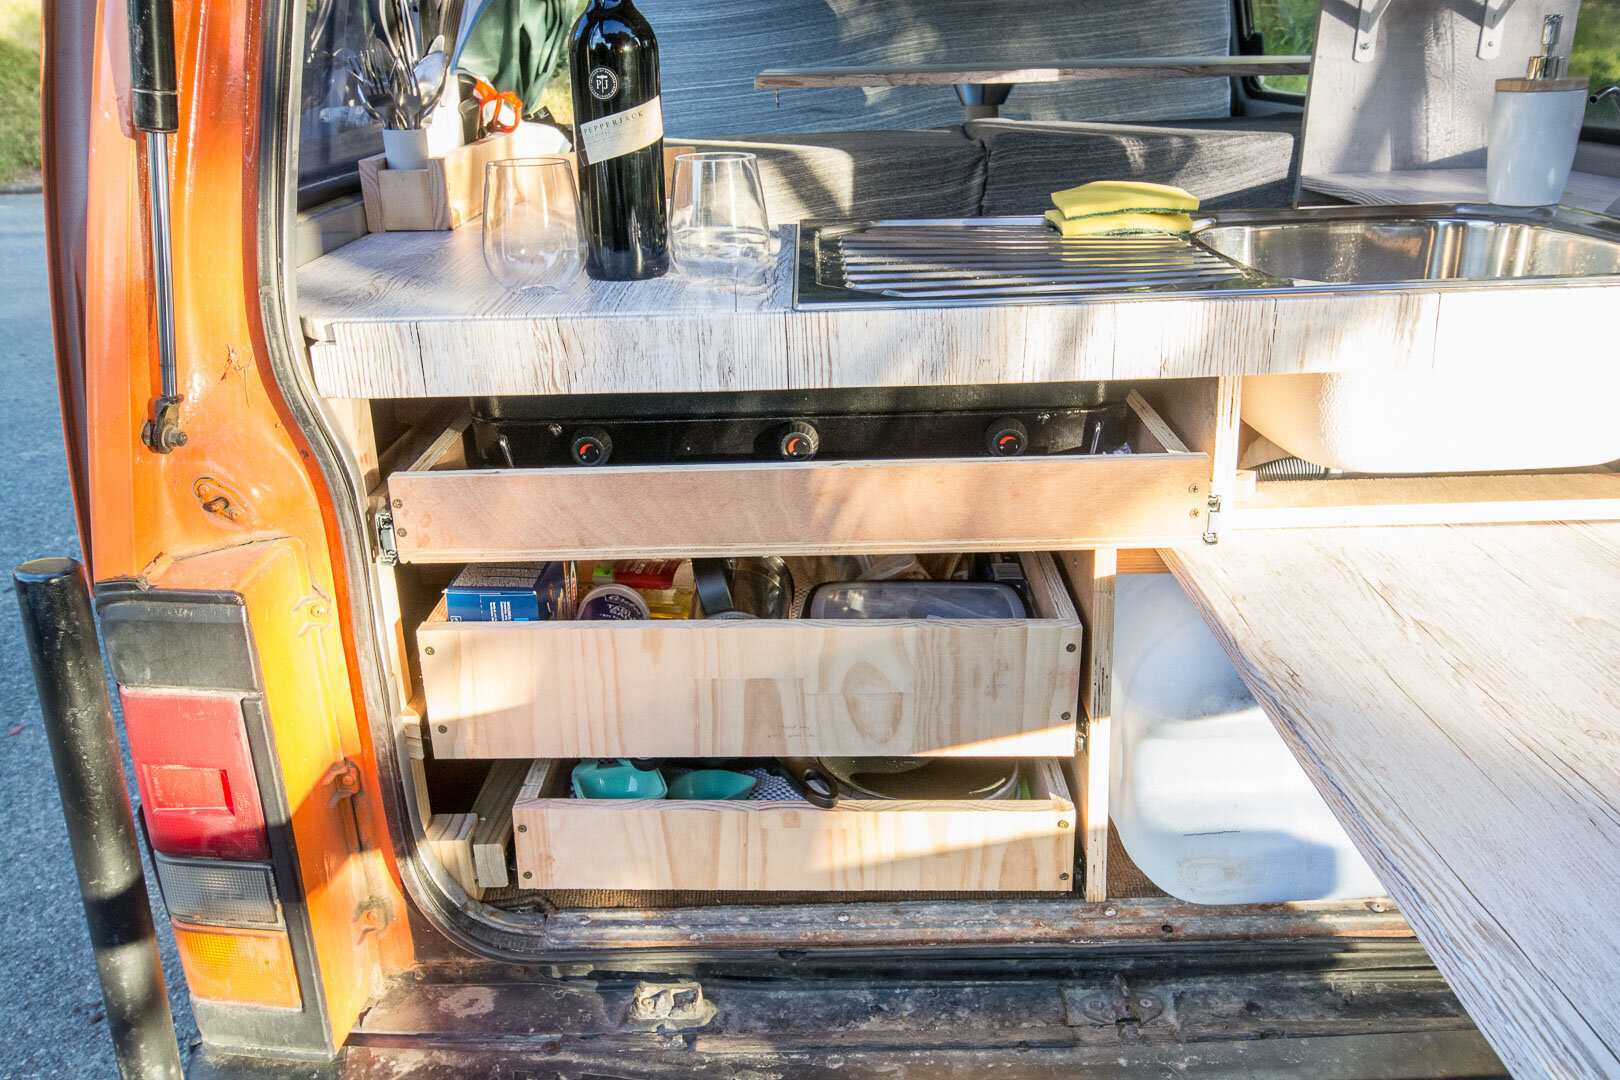
I am quite proud of a few of the unique design elements for our campervan to make the van feel bigger and use every available square inch. I drew inspiration from pictures of other vans I saw and started the design knowing I wanted a van that could convert the bed into a table and couch. I also knew I wanted to have a full-size kitchen sink because Lauren can make a mess when cooking, and our deal is she cooks and I clean up. Most other vans have sinks in them that are like large cereal bowls just to punch the ticket for having a sink. How in the world are you supposed to wash dishes in a cereal bowl sink? The simple answer is you don’t. One of the biggest complaints about the campervans come from people that use the bathroom sinks at camp sites to wash their dishes and clog them with food! We did not want to be like those hoodlums and sully the wonderful system they have here for cheap travel. My requirement for a full-size sink did put me into a bit of a predicament for the design because there was just not enough space for a bed, full size sink, and the toilet to be usable while the bed was made. A long wheelbase would come in hand here now…

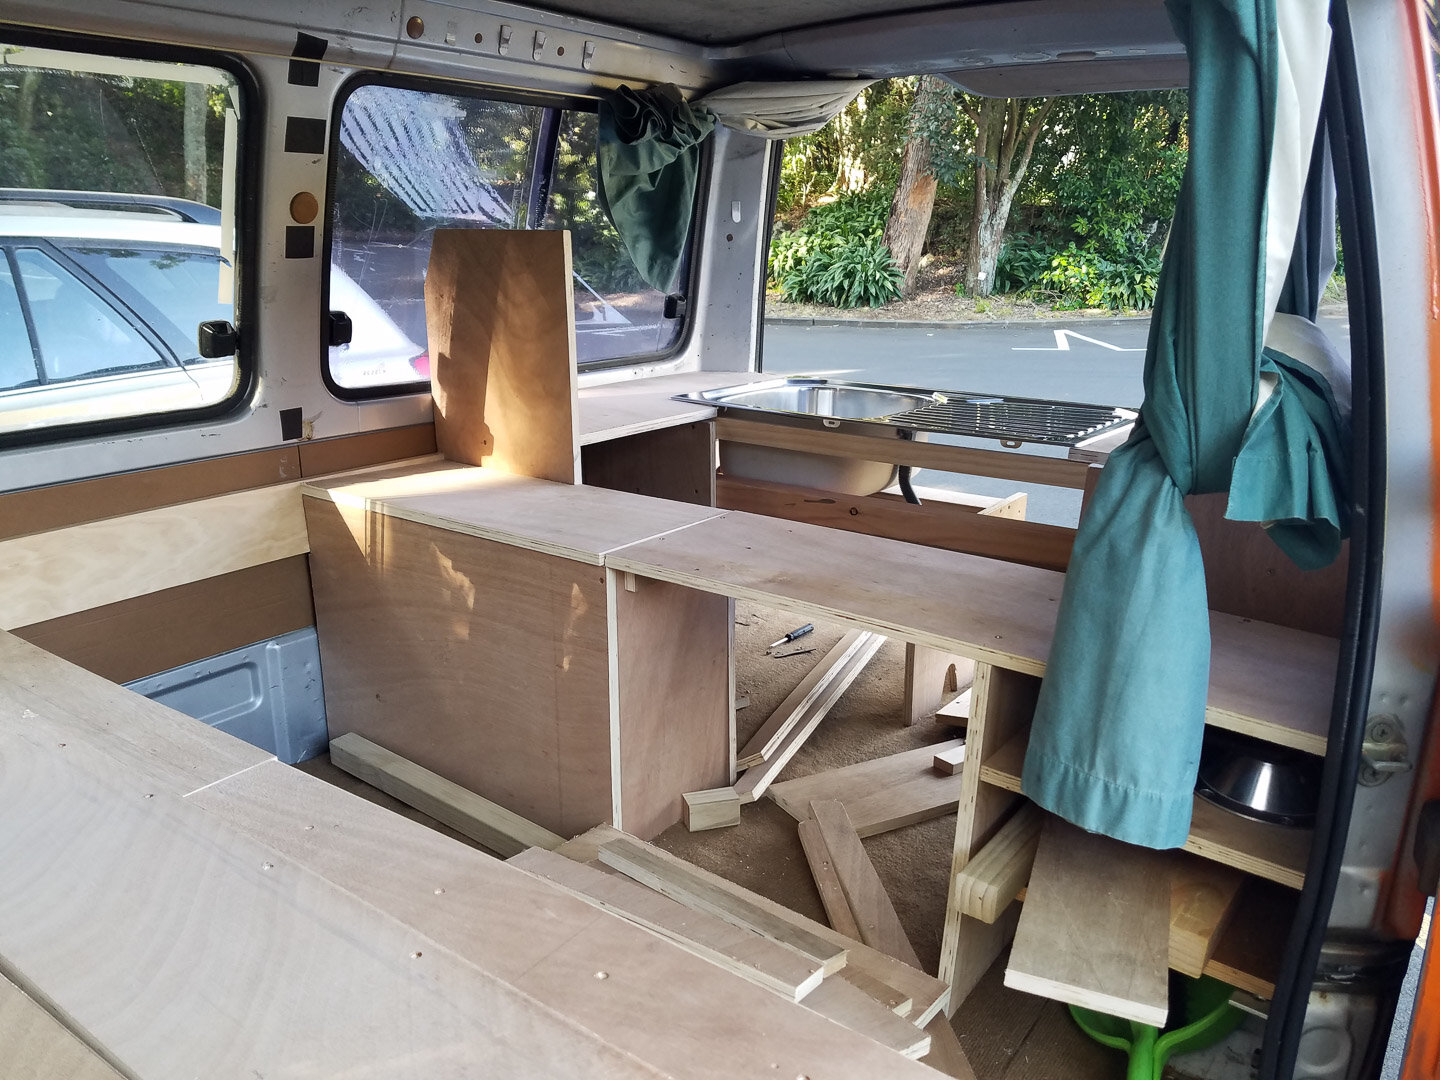
The challenge to fit it all in forced some out of the box thinking that led to my favorite part of the design. The idea of wasting the space in the front seats bothered me because it was so much space within the vehicle going largely unused when parked. We can’t have that. I solved the problem of fitting everything in by folding down the front seats to cantilever the bed over the seats. Sounds simple right? Well yes, it is, but there was one catch in the plan. To get the bed over the top of the seats it had to be higher off the floor which reduced the head room of the couch to where we would have to hunch over. I saw other campervans that obviously had this same situation, but I could not settle for this, I wanted comfort and maximum utility. I had an idea to have a removable section that could raise high enough for the bed and then drop down about four inches for the couch to be comfortable. The supports for this would also have to be removable as they would be in the way of the lower couch cushion.


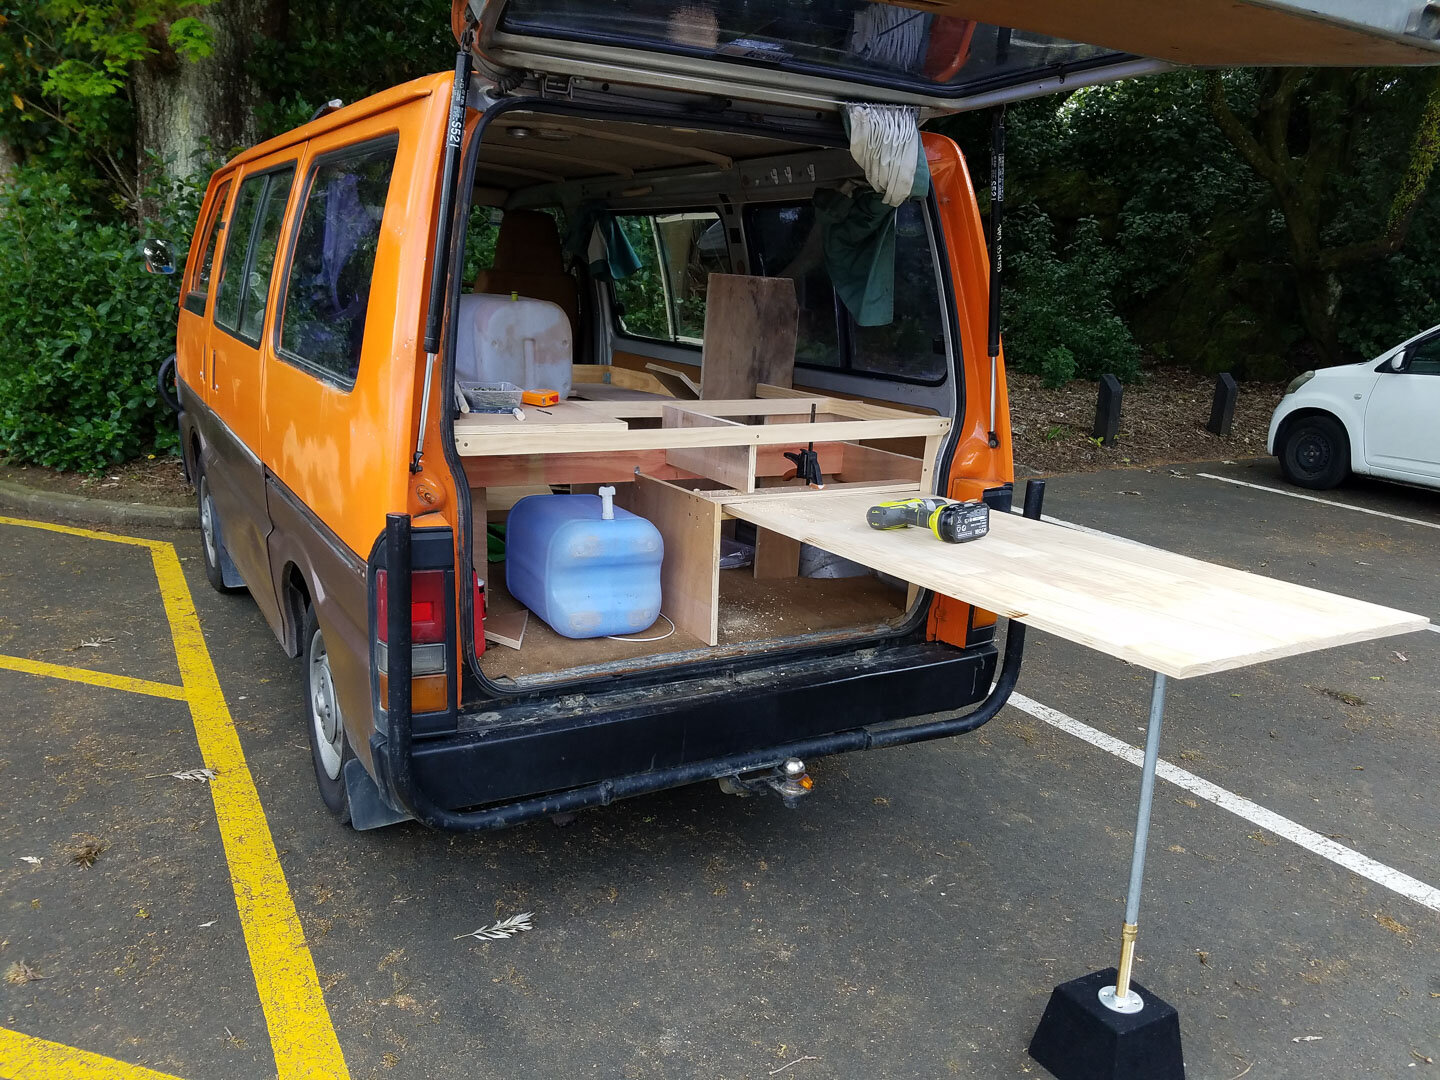
The final hurdle was living with a large piece of wood meant only for raising the bed. It sounded too wasteful, so I needed a secondary purpose for the large board. Remember I said I wanted Lauren to have a lot of sturdy counter space so she would be comfortable cooking? Perfect! This large board could also become a removable table at the rear of the car, slotted and pegged into place with a removable and adjustable leg.

We worked in a few more unique elements into the build that have gotten some jealous stares and compliments while we have been traveling around. While I was trying to decide how to finish all the wood inside the van to keep it from getting stained from cooking or spills, Lauren had an amazing idea that solved the problem and elevated the visual appeal of the build. She came up with the idea to cover the counter and table surfaces in an adhesive vinyl wrap. While we were at it we wrapped the flooring too for protection.

She also helped me with an idea we had for wind/rain protection and privacy in the back of the car when the rear door was open. We used some void spaces in the rear door to tuck away some lightweight water and wind proof fabric that we can easily drop down in seconds to enclose the space. We also found this useful for showering discretely.


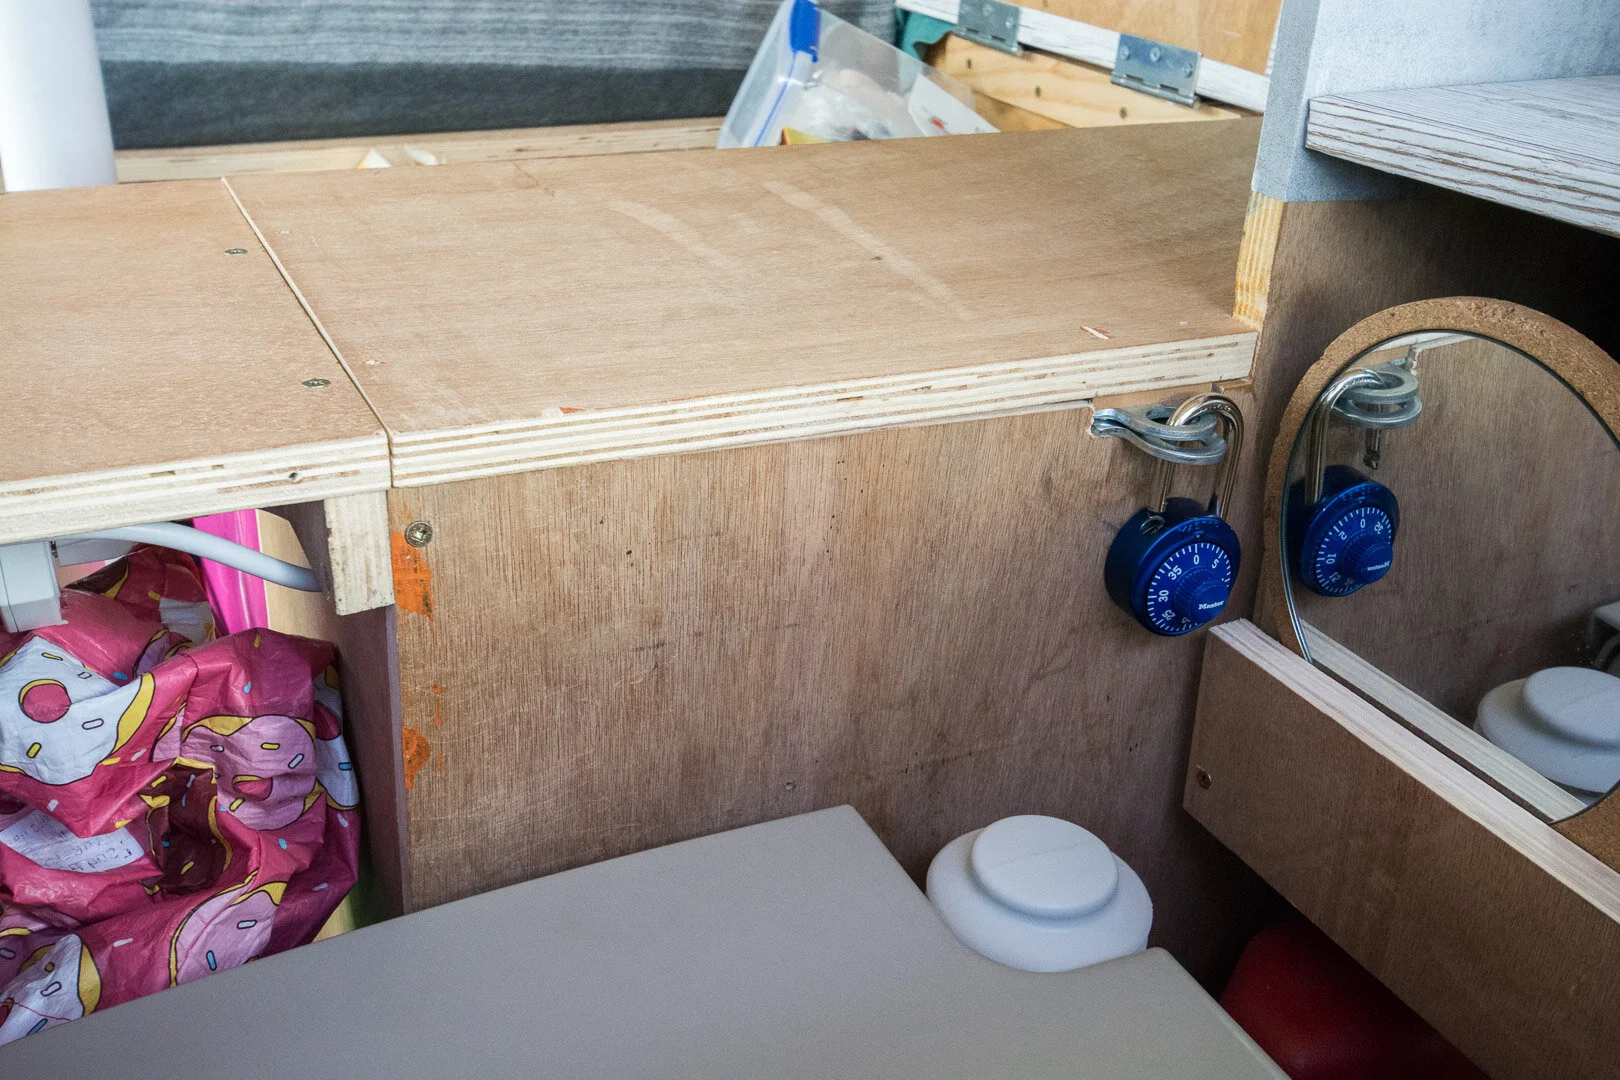
I wanted a way to protect our valuables while we are away from the van, so I built a safe into the design with extra reinforcing and hidden brackets only accessible when the safe is open. We can lock our valuables away with one of our padlocks for piece of mind while hiking or exploring cities and towns.

Lauren’s mattress covers she sewed from scratch!


I forgot to mention the solar system and power inverter! I knew we would enjoy our time more if we could easily keep our phones, laptops and cameras charged up. It is also nice to have lights inside at night instead of a headlamp or candles. I learned quite a bit about solar to do this project and am very impressed at the energy we get out of a single 100W solar panel and a 100ah battery. I found this website to help me with figuring out what size solar panel and deep cycle battery to pair together for our power needs. It’s enough to run a travel fridge, lights at night and charge up any electronics that need juice. The wiring of the system was also very simple and only took a few hours after everything was mounted. The experience has even made me think about investing in solar for our future house.

I really should have kept a log of our time spent building Pumpkin. My best guess is that I spent at least 150 hours and Lauren spent at least 50 hours. I did keep a log of the expenses we racked up during the build to try and keep on target with my $5,000 goal. I think we all know budgets are meant for blowing. We ended up spending $6,500 with every dollar accounted for. I believe we will be able to get our money back out when we sell and hopefully make a little bit of profit. However I am expecting any profit we make averaged over our time spent would be a wage on par with menial labor in South East Asia. My profit was getting to play with all the power tools.

The other unexpected feature in our campervan is lovingly known as “bed couch!” Bad posture is a must for bed couch as sitting up straight is impossible
Selling Pumpkin
It was hard letting go of Pumpkin after all the work we put into her and all the fun we had traveling around. We started our listing at $8,500 which I knew was a bit high, but we didn’t want to give her away either! When we arrived back in Auckland we spent our first day at the Ellerslie Car Fair which is the largest in Auckland and probably New Zealand. It was not a huge car fair but the number of other campervans there blew me away. We were one of 30-50 other campervans there trying to sell to about 10 serious buyers. I think the best time to sell was probably early to mid January. Over the course of the next week we rode an emotional roller coaster while we showed the van and dropped our price twice. The fear of not being able to sell by the time we wanted to crept in, but when we listed Pumpkin for $6,500 the amount of interest was overwhelming and I knew she was a deal at that price. We sold Pumpkin on a Friday to three German girls for the asking price of $6,500 and she is already back out on the road for another adventure with them. In the end we didn’t make any money off of our build, but we did save money from renting something and I got to play with a bunch of power tools!
